
StingerNick
Active Member
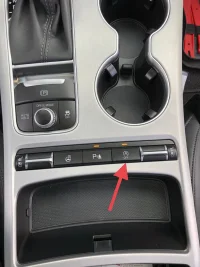
This is the annoying Auto Start/Stop button on the center console (the “A” with the circle around it with an arrow) that you have to push every time you start the car to disable Auto Start/Stop. This mini project should take less than 30 minutes to complete.
Step 1: Open up the center colsole as seen in the “GT Stinger and Me” colsole replacement video. Don’t remove it all the way, just lift it up. It’s super easy to do.

Step 2: Remove the 5 screws holding the row of buttons to the console. There is a screw in the 4 corners, plus another one hiding. You don’t have to unplug any wires.


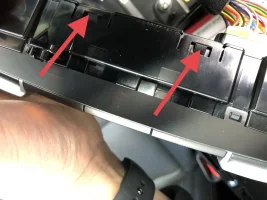
Step 3: Undo the clips on bottom of both sides of the button housing. There are 4 on one side and a few on the other. Once the clips are loose, the housing will slide right off.


Step 4: Now you’ll see the circuit board. Turn the plastic housing (the one with the plastic buttons) upside down to reveal the piece that pushes the button on the circuit board.


Step 5: Roll up some black electrical tape with the sticky side on the outside. Cut it a bit to size and stick it in the button hole. You really don’t need it to be very think, just enough to keep the button pressed down at all times. If the tape is too thick it will make your button stick up a little bit when you put it back together. This bit of tape will keep the circuit board button pressed at all times without the need to physically press the plastic button down. When it’s put back together the button will look normal and you won’t be able to push it down even if you try.


Step 6: Put the button housing back on the circuit board and make sure all the buttons are working. Put all the screws back in, then clip the console back down into place. Now the Auto Start/Stop button will always be turned off when you start the engine.

Side note: I have not seen or heard of any issues with this button being continuously pressed. The button doesn’t get warm or cause any issues. The other buttons in the row (heated/cool seats and heated steering wheel) will turn off after a few seconds if their button is held down.
Step 1: Open up the center colsole as seen in the “GT Stinger and Me” colsole replacement video. Don’t remove it all the way, just lift it up. It’s super easy to do.
Step 2: Remove the 5 screws holding the row of buttons to the console. There is a screw in the 4 corners, plus another one hiding. You don’t have to unplug any wires.
Step 3: Undo the clips on bottom of both sides of the button housing. There are 4 on one side and a few on the other. Once the clips are loose, the housing will slide right off.
Step 4: Now you’ll see the circuit board. Turn the plastic housing (the one with the plastic buttons) upside down to reveal the piece that pushes the button on the circuit board.
Step 5: Roll up some black electrical tape with the sticky side on the outside. Cut it a bit to size and stick it in the button hole. You really don’t need it to be very think, just enough to keep the button pressed down at all times. If the tape is too thick it will make your button stick up a little bit when you put it back together. This bit of tape will keep the circuit board button pressed at all times without the need to physically press the plastic button down. When it’s put back together the button will look normal and you won’t be able to push it down even if you try.
Step 6: Put the button housing back on the circuit board and make sure all the buttons are working. Put all the screws back in, then clip the console back down into place. Now the Auto Start/Stop button will always be turned off when you start the engine.
Side note: I have not seen or heard of any issues with this button being continuously pressed. The button doesn’t get warm or cause any issues. The other buttons in the row (heated/cool seats and heated steering wheel) will turn off after a few seconds if their button is held down.
") So, I just push the Start button, then the very next thing I do is turn off ISG. Is that so hard to remember?
So, I just push the Start button, then the very next thing I do is turn off ISG. Is that so hard to remember?


