How to permanently turn off the Auto Start/Stop button

StingerNick

Active Member
Joined
Jan 10, 2019
Messages
294
Reaction score
168
Points
43
Location
Fairfax, VA
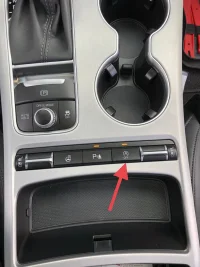
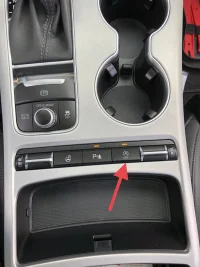
This is the annoying Auto Start/Stop button on the center console (the “A” with the circle around it with an arrow) that you have to push every time you start the car to disable Auto Start/Stop. This mini project should take less than 30 minutes to complete.

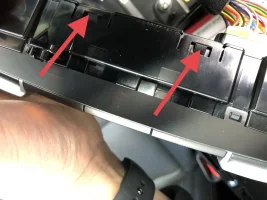
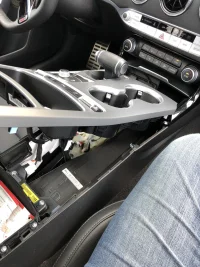
Step 1: Open up the center colsole as seen in the “GT Stinger and Me” colsole replacement video. Don’t remove it all the way, just lift it up. It’s super easy to do.
839E3996-2BAB-4351-8FD5-D5E94297EE7E.webp


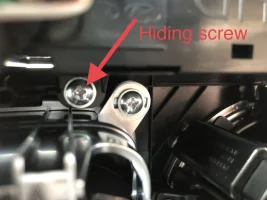
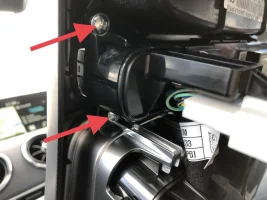
Step 2: Remove the 5 screws holding the row of buttons to the console. There is a screw in the 4 corners, plus another one hiding. You don’t have to unplug any wires.
2CEE083F-25D6-4246-AC73-8ADAD7B8BCB4.webp

FE163F39-A408-464F-81DA-A40DA822B962.webp


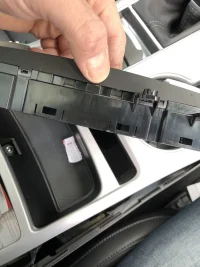
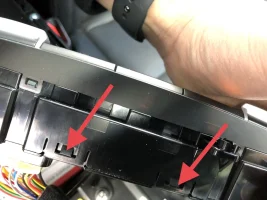
Step 3: Undo the clips on bottom of both sides of the button housing. There are 4 on one side and a few on the other. Once the clips are loose, the housing will slide right off.
E1931965-6DB6-428E-A342-5A3294C6E7C9.webp

C5380C8E-4CA9-47AB-86FA-33F19D288FC9.webp

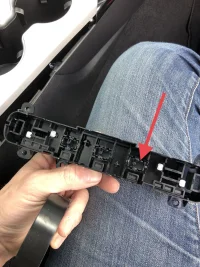
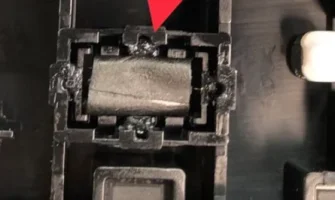
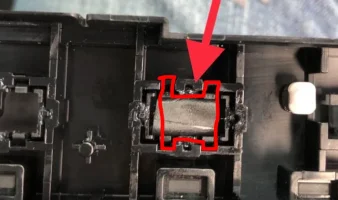
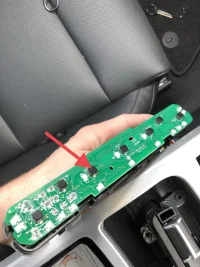
Step 4: Now you’ll see the circuit board. Turn the plastic housing (the one with the plastic buttons) upside down to reveal the piece that pushes the button on the circuit board.
D087E672-887F-4C5B-BC58-C5B32FE4DF86.webp

72AD5110-B9C8-4F47-8E29-19B43E47FFE8.webp


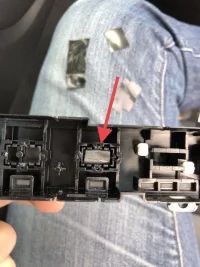
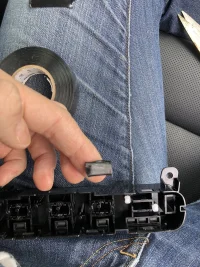
Step 5: Roll up some black electrical tape with the sticky side on the outside. Cut it a bit to size and stick it in the button hole. You really don’t need it to be very think, just enough to keep the button pressed down at all times. If the tape is too thick it will make your button stick up a little bit when you put it back together. This bit of tape will keep the circuit board button pressed at all times without the need to physically press the plastic button down. When it’s put back together the button will look normal and you won’t be able to push it down even if you try.
C1C93A5C-A0AF-4B05-86A6-498AA479957B.webp

CE88388B-5846-4DBE-9CEE-82693AF1B220.webp


Step 6: Put the button housing back on the circuit board and make sure all the buttons are working. Put all the screws back in, then clip the console back down into place. Now the Auto Start/Stop button will always be turned off when you start the engine.
B0BBADDA-2A78-4DB5-B38A-3D34A7E6D99B.webp


Side note: I have not seen or heard of any issues with this button being continuously pressed. The button doesn’t get warm or cause any issues. The other buttons in the row (heated/cool seats and heated steering wheel) will turn off after a few seconds if their button is held down.
 

Attachments

  • 44D7D5E0-27CC-4A3A-9618-E7FE36CD765B.webp
    44D7D5E0-27CC-4A3A-9618-E7FE36CD765B.webp
    120.7 KB · Views: 47
  • EDF86685-1716-4FCE-B8D3-D991F3D1F37D.webp
    EDF86685-1716-4FCE-B8D3-D991F3D1F37D.webp
    159.1 KB · Views: 55
Cool fix. I’ve just shoved a thick business card or anything really in with the button depressed and it keeps it down. Guess I’m lazy.
 
Cool fix. I’ve just shoved a thick business card or anything really in with the button depressed and it keeps it down. Guess I’m lazy.
Yes, that works too! I did that for one day, but that’s all I could take of looking at a ripped piece of paper jammed in my console. The fix is so easy once I figured out the best way to go about it.
 
______________________________
I do like your fix. If I ever get around to it I’ll vinyl wrap the console in brushed aluminum while it’s off (I have a 2.0 Premium).
 
I do like your fix. If I ever get around to it I’ll vinyl wrap the console in brushed aluminum while it’s off (I have a 2.0 Premium).
I bet that would look really nice. I was surprised how easy it was to lift up the console.
 
From interior to exterior to high performance - everything you need for your Stinger awaits you...
Will be doing this when things warm up around here (long wait) and be insulating the pipe supplying hot/cold air to the back seat at the same time.
 
Will be doing this when things warm up around here (long wait) and be insulating the pipe supplying hot/cold air to the back seat at the same time.
Is the insulation of the pipe a big task? How much of a difference will this make? I’m always looking for a new improvement project.
 
Is the insulation of the pipe a big task? How much of a difference will this make? I’m always looking for a new improvement project.
I honestly don't know. I've not taken a close look and haven't seen anyone else having done so. I just don't want my cold drink in the cupholder melting all the ice and warming up because someone in the back seat wants to keep warm. LOL
 
"Research has shown" that aging drivers who go through a startup routine (aka a checklist) have a reduced incidence of dementia. ;) So, I just push the Start button, then the very next thing I do is turn off ISG. Is that so hard to remember?
 
"Research has shown" that aging drivers who go through a startup routine (aka a checklist) have a reduced incidence of dementia. ;) So, I just push the Start button, then the very next thing I do is turn off ISG (Idle Stop and Go). Is that so hard to remember?
Next you’ll have to get EZGO, it lock/unlocks your door without having to push a button.:geek:
 
______________________________
From interior to exterior to high performance - everything you need for your Stinger awaits you...
Finally! I think I'll print a little block to go in there so that the tape doesn't soften and deform with the heat here.
You’d have to print the most perfect height (only a couple millimeters). I suggest something squishy and dense like possibly a piece of foam flooring tiles. Something that can push down enough and have a little give, but not make the button push up awkwardy. The black electrical tape may be the best option.
 
You’d have to print the most perfect height (only a couple millimeters). I suggest something squishy and dense like possibly a piece of foam flooring tiles. Something that can push down enough and have a little give, but not make the button push up awkwardly. The black electrical tape may be the best option.
I'll get in there and see what I'm working with. I can print as low as .1mm in height and I also have flexible filament. I'll let you guys know how it goes.
 
60 seconds with a band saw and a piece of acrylic scrap would solve it..

In all seriousness, if someone wanted to provide exact dimensions, I could laser cut a press-fit insert from scraps I have.
 
From interior to exterior to high performance - everything you need for your Stinger awaits you...
60 seconds with a band saw and a piece of acrylic scrap would solve it..

In all seriousness, if someone wanted to provide exact dimensions, I could laser cut a press-fit insert from scraps I have.
Could they fit snug enough where they would stay in without falling out? You may opening it up and say...screw it, black tape will do the trick perfectly.
 
______________________________
From the looks of it, if cut precisely, it could be made to be a tight enough fit between those little clips to not drop out. Isn't it going to be held in place somewhat by the actual button anyway?

If someone wanted to try it, I'd be happy to cut some in slightly different sizes to see which was the best/tightest fit.
Yes it’s held in there, but you’ll need to flip the button unit right side up to put it back on top of the circuit board...unless you unplug the wiring harnesses, but that sucker doesn’t want to come apart for the 10 minutes that I tried as I also saw in the “GT Stinger and Me” console video.

When trying to diconnect the wiring harness, you get to a point where you start thinging how much will this cost if I break/damage/disconnect the wires or circuit board? Then you stop fiddling with it.
 
Nah, I mean it would be a tight press fit so it won't drop out while installing, if at all. That's why I could make a few for someone to test out. I can cut down to a precision of just under 1/1355" or about 0.018mm..
 
Not that I'm personally interested in disabling this feature, but from the looks of the photos couldn't you just cut a piece of 'H' shaped rigid plastic and fit the arms of the H into the notches in the structure below the button (where the folded piece of tape is shown)? If cut carefully, it shouldn't require any adhesive to stay in place during reassembly.

With that new 'plate' solidly anchored, the membrane switch below it would be firmly depressed when the button panel was reattached, but there would be no upward pressure on the topside button at all.

upload_2019-1-31_1-50-33.webp


upload_2019-1-31_1-48-25.webp
 
From interior to exterior to high performance - everything you need for your Stinger awaits you...
Back
Top