Ghost
Active Member
It was professionally done so I only have a jist of what they didwhat did you use to tap the wires to the tailights? quick connect?

It was professionally done so I only have a jist of what they didwhat did you use to tap the wires to the tailights? quick connect?
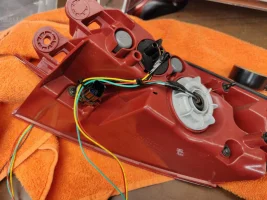
I got mine from Korea, and be very aware that these modules come all by themselves and do not come pre-installed and then melted back into the original reflectors. They are also made by ExLed Studios. I chose to purchase these at about $60, but you will have to lie on the ground to remove your own reflectors, using a bright light and a stubby screwdriver to find and remove the correct black phillips screw located in the corner inside the bumper, right above the exhaust pipes. There is also a slotted corner on each reflector that just slides into a slot on the mount, and you can remove each one only after squeezing together and popping out the split push pin arms to finally release each reflector. You must first test each module on a 12 volt supply system. The very thin colored wires are marked, but first confirm and carefully label each module with tape as left or right, and as driver or passenger. I first watched Dial2Fast cut his own Nissan modules open, using his Dremel and then ordered the special cutter he mentioned. This will work with our reflectors, but requires a vise and a careful eye and hand to cut each reflector open cleanly, as they are have been glued tightly together, instead of using much softer headlight adhesive, which can be easily loosened by just applying heat. After filing and smoothing down all surfaces on each labeled reflector, and matching up the correct sides, I reassembled the matched modules. This will be tricky, as I used heavy clamps and very sticky silicone, which must be also applied on the main power wires that will have to exit out through the completed reflector, after first carefully drilling a hole through the thin plastic peg that makes a perfect location for those 2 power wires that will go directly out to the supplied 4 sequential wire board. I cut those main power wires at about 17 inches, carefully removed both Stinger tail light assemblies, then put on waterproof connectors and shrink wrap , conduit, tape and zip ties where needed. Then re-install and carefully attach each of the completed reflectors, but not too tight, since they are both likely just a little fatter now and won't fit quite the same. Test each wire first and then connect the rear brake lights and signals to the top half of the wiring harness, then drop and thread the wires down below to re-attach the connection to your reflectors. Test everything again and verify everything works, and enjoy the results. Looking back on it now, buying the finished kit would have saved so much more time on finally completing this complicated project, but these great looking lights really should have been offered by the manufacturer as an option right from the factory.Anyone bought the modules only and inserted them into their existing reflectors??
Uh-oh, that is NOT a good idea. We have had several sets fail due to this. The manufacturer will not honor a warranty replacement if this happens, as there is no way to allow for ventilation of the circuit board for it to breathe. (Which is why they are open by design)I re-shrinktubed the module, and then capped the ends with hot glue to seal it. Hot glue is also an excellent strain relief for the wires.
I have a few suggestions for anyone installing these:
- Add additional protection to the circuit board, to prevent any dirt and water from getting in from the sides, where the wires are soldered. I added hot glue to the ends as I noticed that the heat shrink wrap does not fully cover the ends of the board. After the lights are installed you will find that the board hangs low enough to have dirt and water splashed on it when it rains.
Ahh yeah in Minnesota it can be tough with the weather. It doesn't mean you will 100% have an issue since you did that, I just saw the post pop up and wanted to comment so others didn't think it was necessary. The manufacturer uses some type of sealant on the circuit board to protect it from the elements as well.Hey robz32, how are yours holding up being sealed?
I've never had success with unprotected electronics in Minnesota winters, so I'm willing to take a risk on sealing these modules. Otherwise I'll have to design a heatsink for them.
Hey robz32, how are yours holding up being sealed?
I've never had success with unprotected electronics in Minnesota winters, so I'm willing to take a risk on sealing these modules. Otherwise I'll have to design a heatsink for them.
Glad to hear it!Been more than two years since I installed and sealed the circuit boards. No issues whatsoever.
Yeah it may not affect everyone in different climate conditions, hopefully, you won't have any issues.I'll report in if anything changes on my end. So far they are working good, but I know I can't warranty these if they fail.
Worst case, I'll be giving the K8 Stinger Store some more money!
")
Thanks for the input robz32. I'll report in if anything changes on my end. So far they are working good, but I know I can't warranty these if they fail.
Worst case, I'll be giving the K8 Stinger Store some more money!
Glad to hear it!No problem. I did another install of these, using the same method, a few months back and no issues with that one either.
Hi Justin, we're sorry you had a manufacturer's defect with the part you purchased from us. A couple of things to cover here in response to your post:these are absolutely garbage... 2nd set I’ve had that now have failed, this most recent time somehow it affected my turn signal all together where the rear turn signal wouldn’t work, it would light up when I would unlock the car once but not flash, I’ve disconnected them for good now and it’s been a giant waste of money and time, and K8 has been useless with these... wanted me to pay $150 to have a warranty on 2nd set? on top of that for a replacement I had to pay duty on because they’re too stupid to properly declare it at the border... LONG STORY SHORT DONT BUY THESE, and don’t deal with K8. There’s fortunately someone working on quality ones.
Not even going to waste my time you guys run a joke of an operation ... funny how other exchanges/RMA’s I’ve never paid a cent for duty cuz they know how to actually ship things accordingly. $0 value = $0 duty. You idiots declared it as $150 a refundable deposit and thus causing me to have to pay this duty. Either way, for all others who read this don’t buy this product and don’t buy from K8Hi Justin, we're sorry you had a manufacturer's defect with the part you purchased from us. A couple of things to cover here in response to your post:
1) We do not charge $150 to warranty a product, we don't charge any money to replace something under warranty. (If you don't want to remove the defective part and send it back to us to exchange for you, we do have a "refundable warranty deposit invoice" option, where you simply place a deposit on the part and we send it out to you first, and fully refund you once the defective part is shipped back to us)
2) Duty fees, brokerage fees, VAT's, Import taxes, or any other type of fee that you are charged to import a product into your country, has absolutely NOTHING to do with the company you are ordering the parts from, unless they inform you that they are paying your duty fees or taxes as part of your purchase. (and in that case, you usually have to pay more upfront when purchasing)
We are located in the United States, and if you are a customer in a different country ordering from our website, we are happy to ship to you, but we do not pay for your import fees to import the product into your country from ours, that is something you are responsible to pay when ordering.
Regardless, we're sorry you're experience wasn't the best with us, and we are constantly providing feedback to the manufacturer about defects we experience with their parts so that improvements can be made. We also work very hard to try and take care of each and every customer we work with, to the best of our ability. However, we understand the frustrations of being in a different country and experiencing a defective part and needing to have it replaced.
Personal attacks are against our rules. If you have a complaint about a vendor, that's one thing. Please do not break our rules while expressing your side of the story. Just noting from my own experience that these duty fees are a part of importing goods from the U.S. into Canada.You idiots
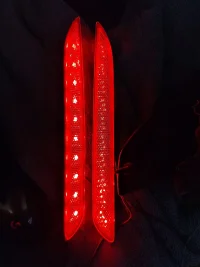
The 2022 is a completely different design as they are much longer in length and then the previous 2018 to 2021 stinger bumper reflector lights. As far as I know, we are the only ones that are selling the 2022 Kia stinger bumper reflector sequential LED lights, and we have had zero issues thus far.How have the updated boards and the new 2022 versions been holding up?
Any updates would be appreciated.
The latest version is definitely an improvement over the previous versions. There were so many complaints about the first two that I considered removing them from the forum store. So far, the latest version is a big improvement.How have the updated boards and the new 2022 versions been holding up?
Any updates would be appreciated.
Do you have access to the 2022 lights?The latest version is definitely an improvement over the previous versions. There were so many complaints about the first two that I considered removing them from the forum store. So far, the latest version is a big improvement.