
I just did mine and have some swirls/scratches. Were you able to restore your paint? If so could you share your method?Emblem installed, I’ll get pics tomorrow... some minor scratches. Definitely going to buff where the edges of the old emblem was. But the emblem looks amazing.
You are using an out of date browser. It may not display this or other websites correctly.
You should upgrade or use an alternative browser.
You should upgrade or use an alternative browser.
How to remove the Kia badge and install the E badge on the Kia Stinger hood
- Thread starter Kia Stinger
- Start date
Wasp Man
Newish Member
Janguli
Member
- Joined
- May 20, 2020
- Messages
- 32
- Reaction score
- 48
- Points
- 18
Just paid a body shop to f*ck up my hood badge. They put it on crooked, then claimed that's how it lined up, they removed it, used some gummy cement shit that was visible from the edges, but it was straight. I figured don't let them get any more chances to f*ck things up so I took it home and used goo gone to get rid of the excess only to see they also managed to put a small but deep scratch right next to the badge. I should have gone to the zoo and had a f*cking monkey do it.
______________________________
westcoastGT
5000 Posts Club!
we've heard this story sooooo many times and it still hurts , sorry dude ! a good body shop should be able to fill that scratch and polish it out .....................make them do it !!Just paid a body shop to f*ck up my hood badge. They put it on crooked, then claimed that's how it lined up, they removed it, used some gummy cement shit that was visible from the edges, but it was straight. I figured don't let them get any more chances to f*ck things up so I took it home and used goo gone to get rid of the excess only to see they also managed to put a small but deep scratch right next to the badge. I should have gone to the zoo and had a f*cking monkey do it.
Janguli
Member
- Joined
- May 20, 2020
- Messages
- 32
- Reaction score
- 48
- Points
- 18
Honestly, I don't trust them or the dealership to do quality work at this point. Couple of weeks ago I was washing the car and what I thought was black trim came flopping off above the door frames, I couldn't believe it. Looking at it closely it was clearly some protective rubber/plastic as underneath it was dark chrome. This was obviously supposed to be removed after shipping but was not. My job requires a high level of attention to detail, I foolishly expect the same out of others.
I'll just live with it I guess. If I were to return to them I would expect them to make matters worse.
.webp")
At least this resulted in a happy finding, unlike everything else so far.
I'll just live with it I guess. If I were to return to them I would expect them to make matters worse.
At least this resulted in a happy finding, unlike everything else so far.
Last edited:
From interior to exterior to high performance - everything you need for your Stinger awaits you...
Ozstung
5000 Posts Club!
Janguli
Member
- Joined
- May 20, 2020
- Messages
- 32
- Reaction score
- 48
- Points
- 18
Thats why its better to do it yourself. I have and done it twice as i needed to change a faulty badge. You just need to take your time.
You are clearly right, I assumed as cars are not my world I should let a "professional" take care of it. Wildly incorrect it seems.
Janguli
Member
- Joined
- May 20, 2020
- Messages
- 32
- Reaction score
- 48
- Points
- 18
You are clearly right, I assumed as cars are not my world I should let a "professional" take care of it. Wildly incorrect it seems. My dash issue, aka the bubble, has resulted in a planned replacement of the right side of the dash. I really don't know if I should go forward with the repair at this point. It would be the dealership doing the work not the repair shop that botched the badge, my limited trust in man has sunk to new lows.
replying to myself now, I'm out.
Jertom08
Newish Member
What happened to StingerGTandMe? Haven't seen any videos from him since 2 years ago when he got sponsored by Shaeffer's oil.
Did mine the other day. i used some twine to saw though the adhesive. Then used a microfiber towel, some soap and a little elbow grease and it came off perfectly. No need for heat or any chemicals
______________________________
From interior to exterior to high performance - everything you need for your Stinger awaits you...


Tinter
Active Member
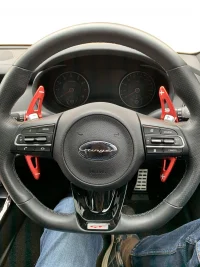
Love that Stinger steering wheel Overlay and is just what is needed and with a little extra help from Sal at the store to add shifter extensions just sets off the interior perfectly.
Attachments
From interior to exterior to high performance - everything you need for your Stinger awaits you...
SoCalSHO
Active Member
Did you have to remove the Kia emblems first?
______________________________
jays2000
Active Member
- Joined
- Oct 4, 2020
- Messages
- 102
- Reaction score
- 69
- Points
- 28
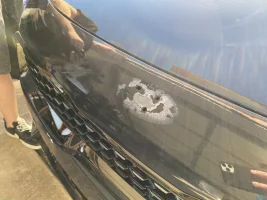
Got my front badge changed out yesterday in under 30 minutes. Thanks to another poster (I'll go find the thread again) I used only a couple of plastic trim removal tools from a kit I bought at Harbor Freight a few years ago.
No heat gun, no Goo Gone, no fishing line.
I used the widest trim tool to slip under the badge and slowly work around the circumference of the badge, cutting in a little deeper each time. At some point I used another wedge to slightly pull up one side while pushing the first wedge a little deeper. I then used the thinner trim tool to split the foam backing between the two posts, then carefully pulled the badge away.
I used my thumb and microfiber towel to roll away the remaining adhesive. In the end, I ended up putting a 1/4" scratch into the bumper, which I could have avoided if I had masked off the paint around the badge first. I left a few other lighter scratches around the top of the badge that were covered up with the new badge.
Attachments
SoCalSHO
Active Member
Mine came off great. Used some monofilament, then a couple plastic trim removal tools. 99% of the tape stayed on the emblem. I lucked out. But then again, the was on the dealer lot for only a week.
jatleson
Member
- Joined
- Oct 21, 2018
- Messages
- 91
- Reaction score
- 27
- Points
- 8
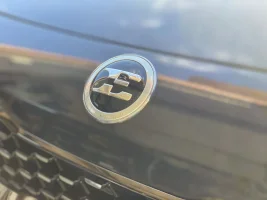
Just got the car Monday, rebadge kit showed up Tuesday, badges on Wednesday. Still need to debadge the back (GT and AWD emblems)
Here's how I did it:
1. Clean the area first, don't won't dirt scratching the paint
2. Painters tape around and like someone mentioned, under as far as possible. Better to pry against tape than paint
3. Heat the badge warm to touch. My garage was 50f degree, but softening the adhessive never hurts
4. Fishing line (I used 4 ib test, heavier is better) to cut through some of the adhessive
5. Work a wide, flat, plastic, trim removal tool around the badge, gently prying up. You'll feel the tool able to slide in further as you continue to work around
6. Once the badge is off get as much residue off by hand, a little heat doesn't hurt here
7. Soak the remaining residue in Goo Gone or adhesive remover of choice (this will take some time, let the product soak in, remove some more layers, apply more product) repeat until all removed.
8. clean area.
9. Polish to remove any scratches left (there will be some, most can polished out) - if you look really close at the last picture, there are some deeper gouges - don't try to polish to perfection)
10. Wipe area down with alcohol to ensure good bond
11. Place badge (if it has pins, make sure to know if pins to rest against top of holes, bottom to align properly - AKA measure twice, stick once)
12. Optional - Apply wax/sealant/coating on badge and area just polished
If there are not pictures, it didn't happen...
From interior to exterior to high performance - everything you need for your Stinger awaits you...

