2.0T Do It Yourself Kia Stinger 2.0L Oil Change

Stinger4Banger

Newish Member
Joined
Apr 3, 2018
Messages
18
Reaction score
8
Points
3
Location
San Diego, CA
After watching StingerGTandMe's video about his 3.3L oil change (and using it as reference to do mine) I decided to write up a mini tutorial since I was under the car already. I also took the chance and installed the Fumoto valve, making life soooo much easier for the next oil change.

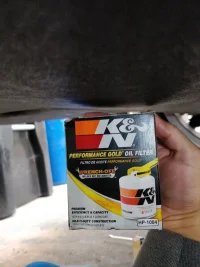
As for parts, the oil I used was Pennzoil Euro L Full Synthetic oil (6 quarts worth). It meets the oil requirements for the 2.0L (ACEA C3 or better) and it's available at Walmart in the U.S. for about 27 bucks for the 5 quart jug. The filter I used was the K&N part number HP-1004.
IMG_20180512_184055.webp
IMG_20180512_184100.webp

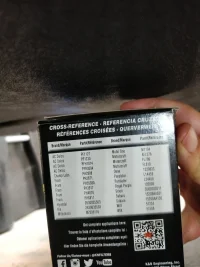
The side of the box has equivalents for other brands if that's your fancy. As for the Fumoto valve, the part number is F-106SX.

I started by removing the 6 bolts from the rear engine panel along with 1 pop clip. The bolts are going to be 10mm and they come loose fairly quick. This is what the panel looks like once off and on the floor, along with how it looks underneath the car with the panel off. IMG_20180512_182706.webp IMG_20180512_182701.webp IMG_20180512_182625.webp
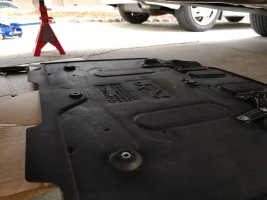
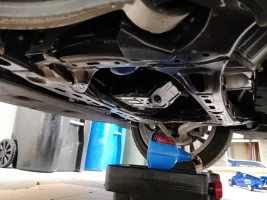
As you can see, lucky for us 2.0L owners, the drain plug is actually quite away from the bar going across the car that the 3.3L has problems with. SWEET. Also to note, the oil filter is right next to the drain plug, unlike the 3.3L where it's inside a hole on the other engine panel (where you risk soaking it in oil and potential sagging). The size of the oil drain plug is 17mm and is torqued to about 28 ft lbs, although as youll see later, I'll install a Fumoto valve in which the torque specs are different (18 ft lbs)IMG_20180512_182843.webp
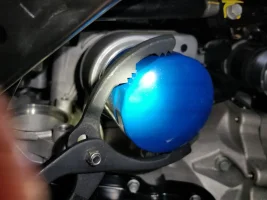
To remove the oil filter youll need either an oil filter wrench or strap, as you can see. What I like about the K&N filter is that it has a nut welded on to the filter itself, allowing for easier installation and removal.
IMG_20180512_183421.webp IMG_20180512_183519.webp

Be wary when removing the oil filter as it will also leak oil. Here is a comparison of the two filters, and a shot of the new filter installed. Don't forget to use some of the oil and rub it along the new filters rubber gasket, which will allow it to seal once installed. IMG_20180512_184131.webp IMG_20180512_184553.webp

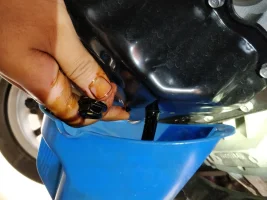
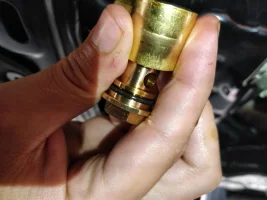
Up next is an optional piece, but the Fumoto valve is a breeze to install and makes changing my oil something I'll look forward to (less of a mess too). If installing this valve, make sure to lubricate the gaskets with some oil, same as the filter. IMG_20180512_185114.webp IMG_20180512_185117.webp

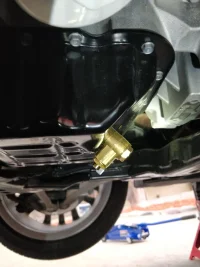
And finally here is the complete product. Functions like a charm, and with the engine panel put back on it is invisible and does not pose a hazard at all. It's actually pretty flush with everything else under the engine panel. Always test for leaks by turning the car on for a bit and letting the oil cycle before putting everything back to how it was. And that's that, if you guys have any questions let me know. Tomorrow I'll be installing an air intake and posting the process for that DIY. IMG_20180512_190208.webp
 

Attachments

  • IMG_20180512_183204.webp
    IMG_20180512_183204.webp
    128.7 KB · Views: 60
Last edited:
Great write-up, and thanks for the info on the Fumoto valve. I usually don’t bother with them on my normally aspirated cars (10k+ mile OCI), but on turbo cars with shorter OCI they are definitely nice to have.

I also agree on the K&N filter. They aren’t usually much more expensive than any other Wix Gold variant and they are much more convenient.
 
After watching StingerGTandMe's video about his 3.3L oil change (and using it as reference to do mine) I decided to write up a mini tutorial since I was under the car already. I also took the chance and installed the Fumoto valve, making life soooo much easier for the next oil change.

As for parts, the oil I used was Pennzoil Euro L Full Synthetic oil (6 quarts worth). It meets the oil requirements for the 2.0L (ACEA C3 or better) and it's available at Walmart in the U.S. for about 27 bucks for the 5 quart jug. The filter I used was the K&N part number HP-1004.

View attachment 7231
View attachment 7232

The side of the box has equivalents for other brands if that's your fancy. As for the Fumoto valve, the part number is F-106SX.

I started by removing the 6 bolts from the rear engine panel along with 1 pop clip. The bolts are going to be 10mm and they come loose fairly quick. This is what the panel looks like once off and on the floor, along with how it looks underneath the car with the panel off. View attachment 7233 View attachment 7234 View attachment 7235
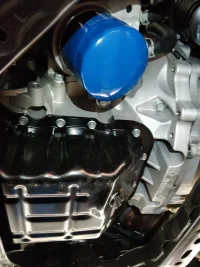
As you can see, lucky for us 2.0L owners, the drain plug is actually quite away from the bar going across the car that the 3.3L has problems with. SWEET. Also to note, the oil filter is right next to the drain plug, unlike the 3.3L where it's inside a hole on the other engine panel (where you risk soaking it in oil and potential sagging). The size of the oil drain plug is 17mm and is torqued to about 28 ft lbs, although as youll see later, I'll install a Fumoto valve in which the torque specs are different (18 ft lbs)View attachment 7236
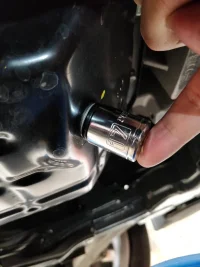
To remove the oil filter youll need either an oil filter wrench or strap, as you can see. What I like about the K&N filter is that it has a nut welded on to the filter itself, allowing for easier installation and removal.
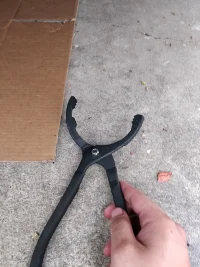
View attachment 7238 View attachment 7239

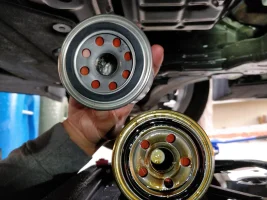
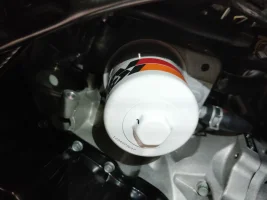
Be wary when removing the oil filter as it will also leak oil. Here is a comparison of the two filters, and a shot of the new filter installed. Don't forget to use some of the oil and rub it along the new filters rubber gasket, which will allow it to seal once installed. View attachment 7240 View attachment 7241
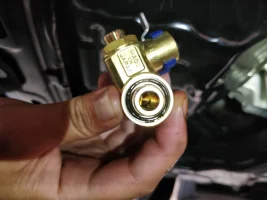
Up next is an optional piece, but the Fumoto valve is a breeze to install and makes changing my oil something I'll look forward too (less of a mess too). If installing this valve, make sure to lubricate the gaskets with some oil, same as the filter. View attachment 7242 View attachment 7243
And finally here is the complete product. Functions like a charm, and with the engine panel put back on it is invisible and does not pose a hazard at all. It's actually pretty flush with everything else under the engine panel. Always test for leaks by turning the car on for a bit and letting the oil cycle before putting everything back to how it was. And that's that, if you guys have any questions let me know. Tomorrow I'll be installing an air intake and posting the process for that DIY. View attachment 7244
Great job!
 
______________________________
Based on your pictures it looks like the cheaper old style Fumoto F-106 would fit great as well. It may sit even higher and less exposed, although I think you are correct that the new style is a non-issue.

Any thoughts?
 
Great write-up, and thanks for the info on the Fumoto valve. I usually don’t bother with them on my normally aspirated cars (10k+ mile OCI), but on turbo cars with shorter OCI they are definitely nice to have.

I also agree on the K&N filter. They aren’t usually much more expensive than any other Wix Gold variant and they are much more convenient.

Yeah since this car is turbo'd I decided an oil change every 5-6k miles would be sufficient, especially with the spirited driving I like to do :sneaky: having the valve on there is going to make it a breeze to do it myself or even to the technician that changes it if I decide to just have it done at a reliable place.

As for the oil filter, the PS-1004 from K&N would work just fine in this case, although the welded nut for easier removal on the HP-1004 (white one) is nifty.

You're also absolutely right about the F-106S valve working on this, main reason being that the drain plug is far away from the cross bar of the undercarriage unlike the 3.3L Stinger. It doesn't allow you to change how exactly the oil drains out, and extends it a small amount, so for the 3.3L I think it wouldn't work too well but I could be wrong. I'd recommend both to anyone with a 4 banger.
 
From interior to exterior to high performance - everything you need for your Stinger awaits you...
I ended up ordering one of the Valvomax oil drain valves to try out on the Stinger. Obviously I haven't actually installed one yet so I have no idea how the fit will be, but I think it will be okay. They're backordered at the moment (probably because of the plug they got from Scotty Kilmer), but I won't be changing the oil for a bit so no big deal. They don't have the Stinger listed on their ordering page, so I just chose a 2014 Optima 2.0L which has the same M14-1.5 threads on the oil pan.

ValvoMax Oil Drain System


I installed the Valvomax today. Went on easy, fits great, no issues with the cover panel. Will update in a few months when I do the first drain with it.
 
As an alternative to the Fumoto or Valvomax, I used a Pela-type oil extractor to remove the oil through the dipstick tube instead of draining. It captured 5.7 quarts, and when I poured in the oil that was in the filter, it reached the 6 quart mark on the extractor.

Yes, I still had to remove the panel to get to the filter. For that purpose, I used a cap style wrench to break the initial tension, then wrapped the filter in a freezer bag and let all the oil drain into the bag. In all, I didn't spill any oil.

Usually, I would at that point remove the drain plug to see if any more oil came out, but I ran out of daylight. And to be honest, with the extractor removing as much as it did, I'm not concerned about anything additional that might have come out via the drain. With my Elantra Sport and my sister's Tucson 1.6T (as well as several other vehicles I've had through the years), the drain plug port was dry after using the extractor.

I do wish the under body panel had either an access panel (a la Mazda) for the filter or at least an access hole (like the Elantra Sport). Ideally, the filter would be on top like many BMW, Mercedes, and Audi/VW cars. The old saying with the GTI was that you could change the oil wearing a tux by using an extractor.
 
Did they change where that cross bar is on the 2019's, where the oil poured out upon in that video? I changed my oil yesterday and didn't have that problem, like my cross bar was further away or something, my oil didn't pour all over it on my 3.3L so I'm wondering if they redesigned that area underneath?
 
You have a GT. This thread is about the 2.0.
 
______________________________
From interior to exterior to high performance - everything you need for your Stinger awaits you...
You have a GT. This thread is about the 2.0.

Sorry, I was responding to these statements from the OP, about the 3.3L GT:

After watching StingerGTandMe's video about his 3.3L oil change (and using it as reference to do mine)

the drain plug is actually quite away from the bar going across the car that the 3.3L has problems with. SWEET. Also to note, the oil filter is right next to the drain plug, unlike the 3.3L where it's inside a hole on the other engine panel (where you risk soaking it in oil and potential sagging).
 
No apology needed, but the OP made this thread about the 2.0 after seeing the video from StingerGTandMe for the 3.3, and references it because the 2.0 is different.

Just don't want other 2.0 owners to be confused.
 
I have a question about raising the car and putting the jack stand in. I cannot see it in the picture clearly but is that jack stand right under the open part underneath where the jack point is? How did you jack the car up and get the stand there? Did you jack the car up at the jack point with the floor jack and then place the jack stand a little further up under the pinch weld?
 
Hi...for the upcoming DIY oil changes on my beautiful brand new Silky Silver 18 Stinger Premium 2.0 , I am planning to again use my easy-to-use, drive-on Rhino Ramps, as I always do with my 07 Optima for regular oil and transmission drain and fills. I will have to carefully check the clearance first, as the Stinger sits a little bit lower to the ground. And I much prefer the high-quality blue OEM H/K 4-cyl oil filters, which can be found online in affordable packs of 10. When you put them on yourself and don't overtighten them, you can always easily get them off. Thinking of going with the Castrol Edge Advanced Full Synthetic 5W-30 for Turbo and GDI, but am still in the break-in period at only 300 miles. Just waxed the car today for the very first time, and then got down on the ground to look under the car and install those very small OEM mud flaps, and then put in those great-looking Stinger all-weather rubber floor mats, which just arrived. The body lines on this car are just so amazing and stunning. But I will definitely need to add some extra trim pieces to cover those very, very wide door sills, which seem to easily collect a lot of water.
 
From interior to exterior to high performance - everything you need for your Stinger awaits you...
Walmart sells the Hyundai filters used on the 2.0T now. The Walmarts near me keep 5-6 stocked. They can be a bit challenging to find in the sea of filters, but they are there.

I change my oil using Rhino Ramps too, and the ones I have fit under the front lip with maybe an inch or so of clearance.
 
______________________________
Thanks for posting this. Very helpful. I'm changing my oil in my 2018 premium 2L right now. I've got about 53k miles and i normally change my oil. I have referenced this post before.

One odd thing this time around on my oil change i couldn't find 0W-30W in my local Autozone or O'Reilly's and after some time of investigation I ended up getting Synthetic Castrol 5W-40 as O'Reilly's has it as a match in their oil specification database as compatible. First time I have veered from 0W-30W Mobile 1.

The store clerk assured me it was an appropriate choice for the Southern California warmer/summer weather.
 
Don't forget to use some of the oil and rub it along the new filters rubber gasket
Never use the old oil. Always use the new oil for this.

And BTW, did you explore oil extraction vs the Fumoto valve?
 
Last edited:
Back
Top