
Stinger4Banger
Newish Member
After watching StingerGTandMe's video about his 3.3L oil change (and using it as reference to do mine) I decided to write up a mini tutorial since I was under the car already. I also took the chance and installed the Fumoto valve, making life soooo much easier for the next oil change.
As for parts, the oil I used was Pennzoil Euro L Full Synthetic oil (6 quarts worth). It meets the oil requirements for the 2.0L (ACEA C3 or better) and it's available at Walmart in the U.S. for about 27 bucks for the 5 quart jug. The filter I used was the K&N part number HP-1004.


The side of the box has equivalents for other brands if that's your fancy. As for the Fumoto valve, the part number is F-106SX.
I started by removing the 6 bolts from the rear engine panel along with 1 pop clip. The bolts are going to be 10mm and they come loose fairly quick. This is what the panel looks like once off and on the floor, along with how it looks underneath the car with the panel off.


As you can see, lucky for us 2.0L owners, the drain plug is actually quite away from the bar going across the car that the 3.3L has problems with. SWEET. Also to note, the oil filter is right next to the drain plug, unlike the 3.3L where it's inside a hole on the other engine panel (where you risk soaking it in oil and potential sagging). The size of the oil drain plug is 17mm and is torqued to about 28 ft lbs, although as youll see later, I'll install a Fumoto valve in which the torque specs are different (18 ft lbs)
To remove the oil filter youll need either an oil filter wrench or strap, as you can see. What I like about the K&N filter is that it has a nut welded on to the filter itself, allowing for easier installation and removal.


Be wary when removing the oil filter as it will also leak oil. Here is a comparison of the two filters, and a shot of the new filter installed. Don't forget to use some of the oil and rub it along the new filters rubber gasket, which will allow it to seal once installed.

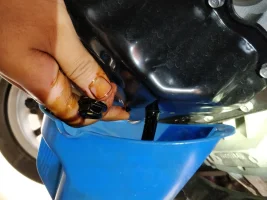
Up next is an optional piece, but the Fumoto valve is a breeze to install and makes changing my oil something I'll look forward to (less of a mess too). If installing this valve, make sure to lubricate the gaskets with some oil, same as the filter.

And finally here is the complete product. Functions like a charm, and with the engine panel put back on it is invisible and does not pose a hazard at all. It's actually pretty flush with everything else under the engine panel. Always test for leaks by turning the car on for a bit and letting the oil cycle before putting everything back to how it was. And that's that, if you guys have any questions let me know. Tomorrow I'll be installing an air intake and posting the process for that DIY.
As for parts, the oil I used was Pennzoil Euro L Full Synthetic oil (6 quarts worth). It meets the oil requirements for the 2.0L (ACEA C3 or better) and it's available at Walmart in the U.S. for about 27 bucks for the 5 quart jug. The filter I used was the K&N part number HP-1004.
The side of the box has equivalents for other brands if that's your fancy. As for the Fumoto valve, the part number is F-106SX.
I started by removing the 6 bolts from the rear engine panel along with 1 pop clip. The bolts are going to be 10mm and they come loose fairly quick. This is what the panel looks like once off and on the floor, along with how it looks underneath the car with the panel off.
As you can see, lucky for us 2.0L owners, the drain plug is actually quite away from the bar going across the car that the 3.3L has problems with. SWEET. Also to note, the oil filter is right next to the drain plug, unlike the 3.3L where it's inside a hole on the other engine panel (where you risk soaking it in oil and potential sagging). The size of the oil drain plug is 17mm and is torqued to about 28 ft lbs, although as youll see later, I'll install a Fumoto valve in which the torque specs are different (18 ft lbs)
To remove the oil filter youll need either an oil filter wrench or strap, as you can see. What I like about the K&N filter is that it has a nut welded on to the filter itself, allowing for easier installation and removal.
Be wary when removing the oil filter as it will also leak oil. Here is a comparison of the two filters, and a shot of the new filter installed. Don't forget to use some of the oil and rub it along the new filters rubber gasket, which will allow it to seal once installed.
Up next is an optional piece, but the Fumoto valve is a breeze to install and makes changing my oil something I'll look forward to (less of a mess too). If installing this valve, make sure to lubricate the gaskets with some oil, same as the filter.
And finally here is the complete product. Functions like a charm, and with the engine panel put back on it is invisible and does not pose a hazard at all. It's actually pretty flush with everything else under the engine panel. Always test for leaks by turning the car on for a bit and letting the oil cycle before putting everything back to how it was. And that's that, if you guys have any questions let me know. Tomorrow I'll be installing an air intake and posting the process for that DIY.
Attachments
Last edited:
 having the valve on there is going to make it a breeze to do it myself or even to the technician that changes it if I decide to just have it done at a reliable place.
