
You are using an out of date browser. It may not display this or other websites correctly.
You should upgrade or use an alternative browser.
You should upgrade or use an alternative browser.
How to remove and replace the rear badge on the Kia Stinger
- Thread starter Kia Stinger
- Start date

AV8R
5000 Posts Club!
- Joined
- Dec 13, 2017
- Messages
- 7,325
- Reaction score
- 2,051
- Points
- 118
- Location
- Perth, Western Australia
Good job did you do it like everyone else?Finished mine today.
______________________________
twelvexes
Active Member
- Joined
- Jun 8, 2019
- Messages
- 118
- Reaction score
- 52
- Points
- 28
Yep. The small Stinger badge came off very easy. The Kia badge was tougher. The fishing line kept snapping, so I made sure I heated it up for a couple minutes with a hair dryer and ended up using one of those plastic tools to slowly pry it off. Had some minor ghosting and fine scratches that easily came out with some polishing compound. The most difficult part is lining everything up level and centered. A lot of measuring to get things correct. Turned out great. No one would ever know it didn’t come that way from the factory. I love it.Good job did you do it like everyone else?
Guzman
Active Member
- Joined
- Mar 10, 2019
- Messages
- 128
- Reaction score
- 63
- Points
- 28
Did my rear badge today. Overall went well. Used hair dryer, fishing line and GooGone. The KIA badge came off reasonably easy, but a lot of glue left over that took a while to remove. The small Stinger script came off very easy as did the glue. Used the foam stencil that came with the larger script.
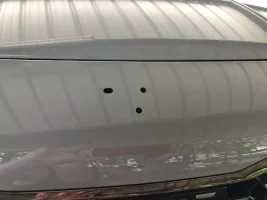
Now for the bad news....watch the original video....made sure it was level....held my breath and installed it..... and it is a little to far left as the right hole is a little visible inside the "g". It is filled with clear silicone (that dried sort of white). You would never see it unless looking for it so I am probably not going to do it again. My question is, with the hole filled with silicone, but somewhat exposed, is there any danger of it being an area that over time lets water in? Would it have been safer to have it completely covered.
Like I said overall happy that I didn't really screw it up, and MUCH better than stock.
Attachments

From interior to exterior to high performance - everything you need for your Stinger awaits you...
AV8R
5000 Posts Club!
- Joined
- Dec 13, 2017
- Messages
- 7,325
- Reaction score
- 2,051
- Points
- 118
- Location
- Perth, Western Australia
You did well!Did my rear badge today. Overall went well. Used hair dryer, fishing line and GooGone. The KIA badge came off reasonably easy, but a lot of glue left over that took a while to remove. The small Stinger script came off very easy as did the glue. Used the foam stencil that came with the larger script.
Now for the bad news....watch the original video....made sure it was level....held my breath and installed it..... and it is a little to far left as the right hole is a little visible inside the "g". It is filled with clear silicone (that dried sort of white). You would never see it unless looking for it so I am probably not going to do it again. My question is, with the hole filled with silicone, but somewhat exposed, is there any danger of it being an area that over time lets water in? Would it have been safer to have it completely covered.
Like I said overall happy that I didn't really screw it up, and MUCH better than stock.
eflyguy
2500 Posts Club!
.. is there any danger of it being an area that over time lets water in? Would it have been safer to have it completely covered.
Just take a close look at it once a month.. or while you wait for fuel to pump. Should not be a problem.
cncBilly
2500 Posts Club!
It will be fineDid my rear badge today. Overall went well. Used hair dryer, fishing line and GooGone. The KIA badge came off reasonably easy, but a lot of glue left over that took a while to remove. The small Stinger script came off very easy as did the glue. Used the foam stencil that came with the larger script.
Now for the bad news....watch the original video....made sure it was level....held my breath and installed it..... and it is a little to far left as the right hole is a little visible inside the "g". It is filled with clear silicone (that dried sort of white). You would never see it unless looking for it so I am probably not going to do it again. My question is, with the hole filled with silicone, but somewhat exposed, is there any danger of it being an area that over time lets water in? Would it have been safer to have it completely covered.
Like I said overall happy that I didn't really screw it up, and MUCH better than stock.
 but if you're worried about it you could add a little clear silicone between the gap and the G. Smooth it with your wet pinky, no one will ever see it. I'm sure your gap is so small not to bother.
airborne82
Newish Member
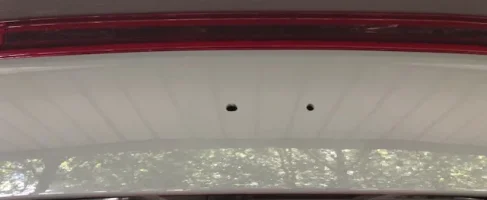
That looks great. I ordered the oval E for back.Yes, there are two holes on the back. However, you are able to cover both holes with the E badge. You just have to break off all of the prongs on the back of the badge before doing so - take a pair of pliers, hold each prong at the base and the prongs twist/break cleanly right off. I filled the holes with a couple drops of silicone to seal them off prior to placing the emblem on.
View attachment 24751 View attachment 24752 View attachment 24753 View attachment 24754
______________________________
From interior to exterior to high performance - everything you need for your Stinger awaits you...
Manaz
1000 Posts Club!
Some people do it without heat - just wedges and fishing wire (and then some goo-remover to clean up the remainder).
It's summer there in Sweden now I believe, if you had an afternoon, you could do it on the street. I enjoyed my brief time in Stockholm in the summer.")
It's summer there in Sweden now I believe, if you had an afternoon, you could do it on the street. I enjoyed my brief time in Stockholm in the summer.
Gargamel
Stinger Enthusiast
Some people do it without heat - just wedges and fishing wire (and then some goo-remover to clean up the remainder).
It's summer there in Sweden now I believe, if you had an afternoon, you could do it on the street. I enjoyed my brief time in Stockholm in the summer.
I just found the removal kit with everything needed, getting this one and get what i need. then i can stand in the sun and be warm and do it.Yes , there overlays that stick on top. Do a bit of a search here. Otherwise someone here might now where to find them.
Premium Emblem Removal/Installation/Preparation Kit - Kia Stinger dot com
wedabakers
Newish Member
- Joined
- Jul 19, 2019
- Messages
- 7
- Reaction score
- 5
- Points
- 3
Same thing happened to me, and I have ceramic silver. I used goo gone, hair dryer, fishing line (pulling outward towards me) and the plastic tools. ended up pulling off some paint. I was lucky it was all hidden by the new badge..But now I'm scared to install my large Stinger script on the back because any error there and it likely won't be covered by the new badge.I watched your YouTube video on replacing badges. I used plastic tools made for removing trim and a hair dryer. The rear badge was no problem other than taking time to remove the sticky tape. The front badge became a big problem. Any pressure on the badge with the plastic tool started causing the paint to chip. I was super careful but my paint chipped no mater what I tried to get the old badge off. I finally removed it and covered most of the small paint chips with the new badge but I have 2 chips that show. I don't know if it's a bad paint job or the color? It's like the paint wasn't sticking very well. My stinger is yellow so be careful, this may be a paint issue?
From interior to exterior to high performance - everything you need for your Stinger awaits you...
Texanlovestotravel
New Member
- Joined
- Aug 12, 2019
- Messages
- 1
- Reaction score
- 1
- Points
- 3
No problem with paint coming off on mine. Did front and rear replacement this weekend. No heat used although it's very warm outdoors. Used dental floss and a small plastic wedge tool. And goo gone gel and alot of scrubbing with cotton towels. Installed the front logo as mentioned here before had to remove a pin from the new badge to line up - all it took was sawing it off with a steak knife. Used clear silicone from a video demo I saw to fill rear holes before installing the big stinger logo. Also replaced the wheel caps - super easy as well. Ordered a package from Amazon that included both emblems and the wheel caps in one package.
Attachments


______________________________
robz32
Texas Stinger Swarm
Looking good. Welcome @Texanlovestotravel
Worked on this today, figured 103 degrees of Texas heat would be enough to help soften the adhesive, and I wasn't wrong. There was a LOT of paint missing under my front emblem (forgot to take a picture), but luckily I was replacing with an oval badge so it was all covered.
Behind the rear badge, there were two small scratches. Those can probably be taken care of with a touchup, being so small right? The other issue there is that there's a ghost oval that I haven't been able to get rid of - any suggestions?
Last (and probably dumbest) question, how do you manage to seal the holes with silicone? I thought I saw it in a video on here and it didn't seem like they were having any problems. Mine keeps sinking into the hole.
Revvdmedia
1000 Posts Club!
Worked on this today, figured 103 degrees of Texas heat would be enough to help soften the adhesive, and I wasn't wrong. There was a LOT of paint missing under my front emblem (forgot to take a picture), but luckily I was replacing with an oval badge so it was all covered.
Behind the rear badge, there were two small scratches. Those can probably be taken care of with a touchup, being so small right? The other issue there is that there's a ghost oval that I haven't been able to get rid of - any suggestions?
Last (and probably dumbest) question, how do you manage to seal the holes with silicone? I thought I saw it in a video on here and it didn't seem like they were having any problems. Mine keeps sinking into the hole.
View attachment 29363
What did you use to remove the badge? Based on my own experience and the picture evidence from others, I'm quite convinced the paint on the front and rear bumpers pretty much can't be touched at all, otherwise it seems to scratch when removing badges. Not sure if this is because of soft paint, the soft material of the plastic/urethane bumper/hatch, or otherwise.
As far as touch up, it depends how OCD you are and what level of quality you're expecting. To be completely honest, the touch up paint will probably not blend as well as you hope, it will always look a little off. As for the other scratches, you can try to smooth it out with a compound, then a polish, but depending on the depth of the scratches they may not clean up full.
I left some scratches in my paint when I removed the badge and replaced with the Stinger script. It bugged me enough that I ended up replacing the script with a different oval badge to cover it.
I used a credit card to prop the edge of the badge up, then slid trimmer line underneath to saw through the adhesive, adding goo gone as I went, then fingers/shop towel + goo gone + some creative cursing to get the rest of it off. Is there a consensus preferred compound and polish that folks generally recommend here? I'm thinking about just taking it to a local detail shop that includes clay/buff/seal/polish, because the paint in general is in rough shape from the previous owner, but it's expensive.
How did you plug the holes when you put the script badge on?
From interior to exterior to high performance - everything you need for your Stinger awaits you...
Revvdmedia
1000 Posts Club!
I used a credit card to prop the edge of the badge up, then slid trimmer line underneath to saw through the adhesive, adding goo gone as I went, then fingers/shop towel + goo gone + some creative cursing to get the rest of it off. Is there a consensus preferred compound and polish that folks generally recommend here? I'm thinking about just taking it to a local detail shop that includes clay/buff/seal/polish, because the paint in general is in rough shape from the previous owner, but it's expensive.
How did you plug the holes when you put the script badge on?
A pro would definitely do a better job than an inexperienced amateur, plus they have the tools to measure the clear coat thickness and know how aggressive they can get with the repair. They might suggest a respray though. As for brands of polish and compounds, pretty much anything works pretty well enough if it is brand name. This includes Mothers, Meguiars, etc. I've used Sonax which is reasonably high end and didn't see any noticeable difference.
For the silicone, just use a tube of it, cut the hole in the tip close to the size of the holes and fill the holes. It does sink in a little, just get a good thick glob in there and then smooth it out after. You'll likely end up with excess on the paint but you can probably peel that off with a fingernail if needed once it dries if you can't get it cleaned up nicely when wet.


