How to remove and replace the rear badge on the Kia Stinger

Where are you guys taking the car to have rebadging done where if they wreck it, they pay to fix it? After the amount of people that botched it, I don't think I want to take the risk, but I REALLY want the Stinger script. I'd feel better if a professional wrecked and then resprayed the panel at their cost lol.
 
Where are you guys taking the car to have rebadging done where if they wreck it, they pay to fix it? After the amount of people that botched it, I don't think I want to take the risk, but I REALLY want the Stinger script. I'd feel better if a professional wrecked and then resprayed the panel at their cost lol.
I took it to a local body shop to remove and replace the script for $50. They said it cost them $350 to repaint it plus they had to buy the AWD and GT badge as well. Still only cost me $50. I asked 4 Kia dealers to do it. They all said no way.

I also did the front skin badge from and the GT stickers on the wheels, both from the Stinger store. Everything looks awesome and people always ask me what kind of car it is. I’m not a fan of the “E” badges, no offense to the E community.
 
The Kia dealers can't do any non-OEM parts, so they'll all say no. Just took the car into the nearest Kia dealership to take pictures and see if they'd cover under the 36 mo paint warranty. Funny, they asked the head tech who walked up how he'd do a badge replacement and basically rattled off the same method.
 
______________________________
If it weren't for the pins, I wouldn't be too worried about it. With the fishing line method I know I can cut the adhesive and then use an adhesive remover which won't rip off paint. It's the bits between the pins that have me most concerned as there would be some degree of tugging rather than cutting. Tugging runs the risk of pulling off paint.
 
The Kia dealers can't do any non-OEM parts, so they'll all say no. Just took the car into the nearest Kia dealership to take pictures and see if they'd cover under the 36 mo paint warranty. Funny, they asked the head tech who walked up how he'd do a badge replacement and basically rattled off the same method.
The new car manager took pics of the script badge in its “OEM” packaging. Said they considered it OEM, but were afraid of chipping the paint.
 
From interior to exterior to high performance - everything you need for your Stinger awaits you...
I failed to do either badge correctly. On the front badge the paint peeled away with the badge in two spots, on the back the fishing line wore a big rub mark all the way through the paint on the bottom side of the badge, oddly enough there were no other marks elsewhere, not even to the clear coat. Not sure how I managed that, maybe had the line at a funny angle while cutting.

I have a blue 2019.
Ouch! At this point it sounds like removing the rear badge means repainting the back panel. Hopefully you can cover up the front paint with the new badge. I always suggest using the front “skin” badge. Takes 10 seconds and looks great.
 
Ouch! At this point it sounds like removing the rear badge means repainting the back panel. Hopefully you can cover up the front paint with the new badge. I always suggest using the front “skin” badge. Takes 10 seconds and looks great.

At first I thought I could cover up the front paint, but there was a little peel I missed at the far right side, so its stock badges all around for me for now.
 
Yeah, just learned the hard way. Here's how it went

1) Used hair dryer to head the rear badge.
2) Used plastic pry tools to get under bage
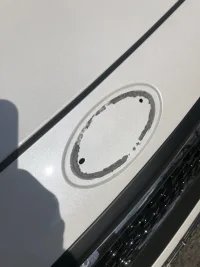
3) Badge successfully removed, residue left on car. Note, at this point there is no paint missing.
View attachment 21304
HOWEVER.

4) Removed residue with fingernails and rubbing, oddly 2-3 spots would not come off.
5) Used goo gone on spots and to clean up the rest of the adhesive area.
6) Spots revealed missing paint - would not say paint even chipped as there were no paint chips to be found, rather the paint had blended into the 3M adhesive

View attachment 21305

Yup, this just in - Kia has refused to cover the damage due to "outside influence". Not that the removal wasn't done correctly, not that there isn't a problem with the paint curing under the badge. Kia has now said straight out - "Don't do this yourself, we have an issue that we're trying to hide".
 
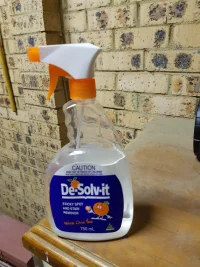
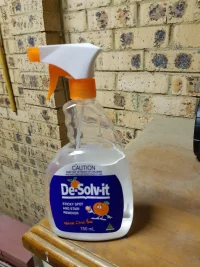
You have to use goo remover first, spray under the badge first. Leave it for about 20 minutes and then lift gradually and keep the spray up. When i got the badge off the tape had disintegrated and disappeared it was magic. I also used a hairdryer, credit card type card and low strain fishing wire. I started off with dental floss.

This stuff below is what i used and others have agreed its the go. Got it from the hardware store down here.20180831_200342.webp
 
______________________________
From interior to exterior to high performance - everything you need for your Stinger awaits you...
I just removed the front and rear badge on my friends 2019 Niro today using a hair dryer and fishing line. The paint chiped just a bit on the front when removing the adhesive, but was covered up by the new badge. After removing the adhesive I also noticed two tiny orange rust looking spots that I could not remove. You can the spots in the photo below.

F9E9EB0F-71D0-4CED-9835-F1716070A911.webp

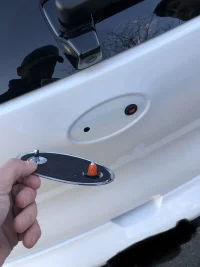
After using fishing line on the rear badge, I realized that it was being held by plugs only. No adhesive at all. Much easier to remove!
A92DE285-B872-472C-B983-262AF2FD0375.webp
 
I just removed the front and rear badge on my friends 2019 Niro today using a hair dryer and fishing line. The paint chiped just a bit on the front when removing the adhesive, but was covered up by the new badge. After removing the adhesive I also noticed two tiny orange rust looking spots that I could not remove. You can the spots in the photo below.

View attachment 21477

After using fishing line on the rear badge, I realized that it was being held by plugs only. No adhesive at all. Much easier to remove!
View attachment 21479

The rust spots, that is on the "plastic" front bumper, not metal, right? If yes, use Carpro Iron-X. Clean the area first, then spray the Iron-X, let it dwell a moment, lightly rub with a sponge, the spray off and wipe down with a clean microfiber, or at least that's the instructions as I remember them. I had a metric buttload of iron contaminant rust on my car when I took delivery, but the Iron-X worked wonders and cleaned it right up. I used it a few times on the Mustang but the results were much more obvious on this White Stinger with very visible rust iron contaminants on the clear coat. It's going to need a lot of work come this spring, it's covered in orange spots in the draft path from the front and rear brakes...
 
You have to use goo remover first, spray under the badge first. Leave it for about 20 minutes and then lift gradually and keep the spray up. When i got the badge off the tape had disintegrated and disappeared it was magic. I also used a hairdryer, credit card type card and low strain fishing wire. I started off with dental floss.

This stuff below is what i used and others have agreed its the go. Got it from the hardware store down here.View attachment 21476
How did you get the spray under the badge? Did you heat it first and pry it up a bit?
 
How did you get the spray under the badge? Did you heat it first and pry it up a bit?
I heated with a hairdryer and lifted fractionally the top with dental floss and sprayed goo remover and it started to dissolve . Took about 20 minutes to really take effect. Lift and spray gradually whilst applying moderate heat. A thin plastic card is also useful.
 
From interior to exterior to high performance - everything you need for your Stinger awaits you...
I heated with a hairdryer and lifted fractionally the top with dental floss and sprayed goo remover and it started to dissolve . Took about 20 minutes to really take effect. Lift and spray gradually whilst applying moderate heat. A thin plastic card is also useful.
Does the goo remover cause any issues with the clear coat? Do you recommend any super safe removers?
 
______________________________
Does the goo remover cause any issues with the clear coat? Do you recommend any super safe removers?
No issues what so ever. All it does is break down the 3m tape and dissolve it. Heat alone is going to be extremely hard work. I used this.20180831_200342.webp
 
I heated with a hairdryer and lifted fractionally the top with dental floss and sprayed goo remover and it started to dissolve . Took about 20 minutes to really take effect. Lift and spray gradually whilst applying moderate heat. A thin plastic card is also useful.
Thank you. I appreciate the advice. Looks like patience and care is the trick. I will be installing the Loden K 3.0 badges. These have no posts so alignment will be the next challenge.
 
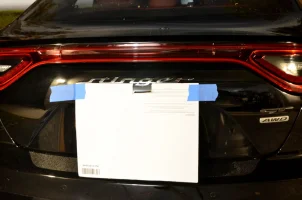
For those going with the large Stinger script on the back, I found it easiest to use a piece of cardboard as a guide to keep the badge level. I just made a cutout to allow for the "g" and everything else could ride on the cardboard. This allowed me to see the holes while I lined everything up which I was way more comfortable with than trusting the template. Ended up being super easy!

Stinger Script.webp
 
Sounds like we had the same problem so I know it wasn't the color. I suspected that or the fact it was plastic underneath. Hope it works out with some touchup paint.

Same problem here. Looking for a recommendation on the paint pen solution for ceramic silver Stinger
 
From interior to exterior to high performance - everything you need for your Stinger awaits you...
Back
Top