Viable LED low/high beam option for base model halogen headlights

hummus

Active Member
Joined
Aug 2, 2018
Messages
267
Reaction score
238
Points
43
Hello all,

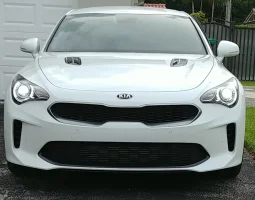
For those interested in a viable LED bulb option for the base model halogen headlights, I was able to find these on amazon: SEALIGHT S1 Series 9005/HB3. (sorry about the lack of a link, I am too green to do so at this time)

I stress that only consider this viable because it fits in the housing, though I can't speak to reliability--at least not yet. They actually fit very easily, requiring less clearance than the generic HID bulbs they are replacing in my rig.

In my case, I did not receive a bulb-out error message on the display. In fact, I tried two different models of anti-flicker/error cancel modules; with either of them in place, the bulb would not ignite regardless of polarity settings. So, I'm running them straight off the factory wiring with no issues thus far. Granted, I installed them only a day before posting this.

I did run into a slight problem indexing the bulbs in the housing. The recommended orientation appears to place the LEDs facing horizontally, with the center axis vertical. The best seating position I could find was 45 degrees off from this, but I plan to try repositioning them in the near future. Even still, I much prefer the output to the factory halogens or the generic HIDs I ran for a week. The color is very close to the factory DRLs, in case that is important.

I'll report back with more observations after running them for a while. I'm interested to see how they do in the confined space, as I did put the dust caps back in place, and the bulbs don't seem to have a fan.

It goes without saying that I'm just sharing my own experience thus far, and YMMV if you choose to try out something similar.

Enjoy and stay safe,
hummus
 
Last edited:
No error messages so far, going on day 4. I haven't done any night driving but the lights come on plenty during my commute with cloud cover, overpasses, etc. I haven't re-indexed the bulbs yet either. More to come as I continue to test these.
 
Another update. I was able to index the passenger side bulb by trimming the locking tabs. It turns out that the factory 9005 bulb has a small tab at 12:00 and larger tabs at 4 and 8 o'clock, while these LED bulbs the small tab is at 4 or 8 o'clock. I was able to seat them originally, but they were not oriented correctly. With some careful trimming, I was able to get the bulb to mount upright, aiming the LED modules horizontally install of at an angle.

Very nice improvement, even just having one side done. The pattern changed from a hotspot on the ground originally, and is now a nice fan of light on the ground with a sharp, horizontal cutoff at distance. This makes sense, considering the original installation had one LED module pointing at the ground at an angle, while the other was aiming up into the cutoff shutter.

I will do the other side and hopefully be cleared to post pictures soon.
 
______________________________
Got everything buttoned up, results shown below on the car and on the road. I'm pleased. I have about 4-5 hours of on-time so far, and no observed problems: still no error messages, and no failures to light up.

One last thing I discovered is that I could use my phone and the stock bulb as a makeshift template for trimming the new bulb by:
1. taking a picture of the stock bulb from directly in front of it
2. zooming the picture to make it life-size
3. holding the new bulb in front of the picture to compare the tabs to the stock bulb

This made it easier to trim the tabs on the second bulb.

That's all I have for now, unless I get some new inspiration or problem in the future. Let me know if any questions.

Thanks all
 

Attachments

  • 20180831_200008.webp
    20180831_200008.webp
    74.5 KB · Views: 85
  • 20180831_185347~2.webp
    20180831_185347~2.webp
    65.4 KB · Views: 90
Looks good. Other forum members should find this useful.
 
From interior to exterior to high performance - everything you need for your Stinger awaits you...
Hi Hummus,

Love your car as I got the exact same one.
I’m trying to change out my headlights and can’t seem to figure out how to remove the fender cap.
I can remove the top clip but can’t seem to remove the bottom 2. (Picture attached)
Any suggestions on how to remove it?

Cheers,

Will K
 

Attachments

  • C99B6A70-D129-4344-A3F7-6925E6E6D5C1.webp
    C99B6A70-D129-4344-A3F7-6925E6E6D5C1.webp
    56 KB · Views: 33
Hi Hummus,

Love your car as I got the exact same one.
I’m trying to change out my headlights and can’t seem to figure out how to remove the fender cap.
I can remove the top clip but can’t seem to remove the bottom 2. (Picture attached)
Any suggestions on how to remove it?

Cheers,

Will K

I love hummus. Like the one with olive oil and pine nuts. Sooo tasty.

It’s so versatile. You can eat with tortilla chips, bagel crisps, slap it on burgers.

Love it.
 
A lot of aftermarket LEDS don't give a good pattern, especially in projector housings.
How are you finding these for night use, is the range and light spread as good as stock ?
 
Hello all, I bought the Morimoto for stinger 2.0. When I hook up I am getting flickering from one bulb and message on cluster. I didn’t have the canbus(anti flickering) cables. You have any insight to offer.

I have 9005 bulbs. Relay hooked to positive and negative to body. Also have the amp igniters. And ballast box.

One light comes on the other one flickers and you can hear buzzing from us relay.
 
Hi Hummus,

Love your car as I got the exact same one.
I’m trying to change out my headlights and can’t seem to figure out how to remove the fender cap.
I can remove the top clip but can’t seem to remove the bottom 2. (Picture attached)
Any suggestions on how to remove it?

Cheers,

Will K
those are rivets, bend the flap back it stays connected to the wheel well......I find it useful to remove the tires to get a good grip on the dust cover.
 
______________________________
From interior to exterior to high performance - everything you need for your Stinger awaits you...
Any updates with how these bulbs worked out? I’m looking to do the same upgrade up my 21 GT line.
 
I haven't had the car for a while now, but those lights never gave me any issues. That was quite a few years ago though, so even if those exact brand/model bulbs are still available, they probably aren't identical to what I bought back then.

Hopefully there are more plug-and-play options now without having to fuss with trimming like I did back then.
 
Awesome thank you! They have them on Amazon for $40 so they’re worth a try. I found another set that looked good but they had fans and a converter so I figured they wouldn’t fit in the headlight housing with the cap on.
 
Awesome thank you! They have them on Amazon for $40 so they’re worth a try. I found another set that looked good but they had fans and a converter so I figured they wouldn’t fit in the headlight housing with the cap on.
I am wondering how these turned out for you. Which ones did you go with?
 
I am wondering how these turned out for you. Which ones did you go with?
I haven’t got around to doing the swap yet but I think I’m going to go with these.

 
From interior to exterior to high performance - everything you need for your Stinger awaits you...
Awesome thank you! They have them on Amazon for $40 so they’re worth a try. I found another set that looked good but they had fans and a converter so I figured they wouldn’t fit in the headlight housing with the cap on.
My led's have a heat sink version (metal tabs) which I actually had to modify (cut off a bit) to make it fit.....the cap is on but all the inner packing had to go..brand is in my sig pic......incidently still as bright as can be and much better than the halogen crap.
 
______________________________
I haven’t got around to doing the swap yet but I think I’m going to go with these.

Those look like they need quite a bit of depth between the socket and the dust cap. The diagram looks like it is 1.09"--that's quite a bit.

Are you able to check if that fits, and how much clearance it would leave if you want to run with the dust caps installed? (I would check but I no longer have my 2.0). If there is a built in fan, it would probably be be best to leave some space between.
 
they won't fit.......imho.
 
Those look like they need quite a bit of depth between the socket and the dust cap. The diagram looks like it is 1.09"--that's quite a bit.

Are you able to check if that fits, and how much clearance it would leave if you want to run with the dust caps installed? (I would check but I no longer have my 2.0). If there is a built in fan, it would probably be be best to leave some space between.
Thanks for pointing that out! For some reason I didn’t realize how far those came out. I was trying to find ones that were adjustable so I could get the proper 3 and 9 alignment without modification. These ones look to be a lot more shallow and still have the adjustability.

 
Thanks for pointing that out! For some reason I didn’t realize how far those came out. I was trying to find ones that were adjustable so I could get the proper 3 and 9 alignment without modification. These ones look to be a lot more shallow and still have the adjustability.

yes those are what I use, however they will need some trimming........they simply won't go in without the edge (facing you in the picture) grinded off. i used a bench grinder if memory serves......it's only aluminium so they trim quite easily.
 
From interior to exterior to high performance - everything you need for your Stinger awaits you...
Back
Top