niko
Stinger Enthusiast
I got to give up to Philip Factory by far the best to order parts from. Especially any M&S parts!!! I have already bought the rear M&S G-Type spoiler from him. So I decided to order the full kit from him. M&S Front Splitter Lip , M&S Side Splitter Skirt, and M&S Rear Diffuser minus the rear wing type lip, will get that later. First i gotta say that shipping was fast af , got it within 4 days or so. I got my package on a friday. They came package with protection(bubble wrap/foam protection). Every item came with double sides tap and self taping screws, and a set of long screws and nuts for the front lip.


I didn't get to installing until tues after work had things to do over the weekend , was highly attempted to cancel them to do the install haha
") . So onto the installation. First I test fitted everything before drilling. the sides fit like a charm, underneath the vehicle towards the back rim theres a small rubber lip that i used as my reference point for both sides. unfortunately i didn't use the double side tape for the sides, u can if u like but i went with the self taping screws. had one person hold it in place while i screwed it in. i used my small battery powered snap-on drill. i never had to lift the car up on jacks. it came with enough self taping screws to hold it in place. after installing all screws i tried to wiggle it to see if any movement, there was none.
. So onto the installation. First I test fitted everything before drilling. the sides fit like a charm, underneath the vehicle towards the back rim theres a small rubber lip that i used as my reference point for both sides. unfortunately i didn't use the double side tape for the sides, u can if u like but i went with the self taping screws. had one person hold it in place while i screwed it in. i used my small battery powered snap-on drill. i never had to lift the car up on jacks. it came with enough self taping screws to hold it in place. after installing all screws i tried to wiggle it to see if any movement, there was none.


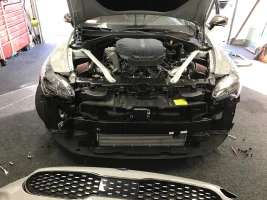
Next i installed the front lip, first pic will show reinforcement on the backside of the lip. i decided to remove the bumper to make it easier. the bumper literally took about 20min to remove do to the fact it was my first time removing it and took mine time making sure i didn't break anything. it was pretty simple to remove and put back on. once i removed it, i sat it on a box i had in the garage it was perfect for it. i then remounted by hand and used c-clamps vise to hold it in place one on each end. then i drilled holes in those little square boxes u see on the first pic. i used the screws and nuts it came with they were enough to hold it together i think there was 10 of them. i didn't use the double sided but u may if u like. once i drilled the hole i used the washer, screws, nuts then tighten it. it fit like a charm. was very sturdy and didn't move when i tried to move it. then i installed it back on.


last but not least was the rear diffuser. test fitment was perfect. this came with four self taping screws but instead if drilling i used most of the double side 3m tape i got i used a lot all over the rear diffuser enough to hold strong. once all tape i had me another person align it up to the existing two diffuser, then we pushed it up and pressed firmly with two hands each. held for about 30 seconds then it was done.
overall i am very happy customer i will be doing more business with Philip Factory already order a few interior stuff from him waiting for them to come. If you have any questions please fill free to ask or message him on eBay as well. he has answered all my question before buying. Now its tie to enjoy my ride hope all you as well fellow stingers")


, got it within 4 days or so. I got my package on a friday. They came package with protection(bubble wrap/foam protection). Every item came with double sides tap and self taping screws, and a set of long screws and nuts for the front lip. I didn't get to installing until tues after work had things to do over the weekend
, was highly attempted to cancel them to do the install haha . So onto the installation. First I test fitted everything before drilling. the sides fit like a charm, underneath the vehicle towards the back rim theres a small rubber lip that i used as my reference point for both sides. unfortunately i didn't use the double side tape for the sides, u can if u like but i went with the self taping screws. had one person hold it in place while i screwed it in. i used my small battery powered snap-on drill. i never had to lift the car up on jacks. it came with enough self taping screws to hold it in place. after installing all screws i tried to wiggle it to see if any movement, there was none. Next i installed the front lip, first pic will show reinforcement on the backside of the lip. i decided to remove the bumper to make it easier. the bumper literally took about 20min to remove do to the fact it was my first time removing it and took mine time making sure i didn't break anything. it was pretty simple to remove and put back on. once i removed it, i sat it on a box i had in the garage it was perfect for it. i then remounted by hand and used c-clamps vise to hold it in place one on each end. then i drilled holes in those little square boxes u see on the first pic. i used the screws and nuts it came with they were enough to hold it together i think there was 10 of them. i didn't use the double sided but u may if u like. once i drilled the hole i used the washer, screws, nuts then tighten it. it fit like a charm. was very sturdy and didn't move when i tried to move it. then i installed it back on.
last but not least was the rear diffuser. test fitment was perfect. this came with four self taping screws but instead if drilling i used most of the double side 3m tape i got i used a lot all over the rear diffuser enough to hold strong. once all tape i had me another person align it up to the existing two diffuser, then we pushed it up and pressed firmly with two hands each. held for about 30 seconds then it was done.
overall i am very happy customer i will be doing more business with Philip Factory already order a few interior stuff from him waiting for them to come. If you have any questions please fill free to ask or message him on eBay as well. he has answered all my question before buying. Now its tie to enjoy my ride hope all you as well fellow stingers