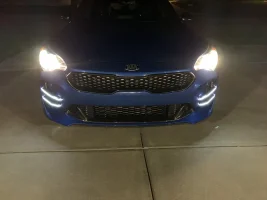
Cool i ordered mines from kdm warehouse too. Mines should be in soon so i just wanted to be prepared in advance. Any other tips u would give me for install to make it less painful as possible? Lol
Get a 9 volt battery and test your connections. I connected my wires using wire connectors. You can get these at just about any auto parts store
https://www.lowes.com/pd/Utilitech-20-Count-T-Tap-Wire-Connectors/999956682
I got the variety pack and the blue ones worked. Buy two packs just to be safe. First thing you do, test the lights with the battery. Then once you start connecting wires, test the lights again. Test every connection. You can get a 9 volt battery at Walmart for $5. They used to be common in kids toys and stuff, but I didn't have one in the house so had to go grab one. Well with your time/money.
If you search my posts, you’ll find the tips and pictures that helped me as well.
On a couple of my splices I ended up just twisting them together and using a heat shrink wrap to weather proof. The t taps can be hard to get the connection you may have to twist on them a little, try to get the wire exposed to the metal on the t tap.
Once you get to where you’re connecting the lights red wire to the head lamp yellow, that’s the one you’ll want to play with if the lights don’t come on after the first try. You may have to twist or disconnect/reconnect that t tap. I had my headlights turned on and messed with the taps until I saw the claws come on. Just remember to check all your connections along the way with that 9 volt battery so you know when you’re connecting to the headlights wires that’s the connection you’re focusing on. Took me three nights because I didn’t think to test each connection.
you’ll get the lights with a two sets of wires for each claw, already connected to the claw. That was annoying to me because I had to connect that together. They are red and black wires. I pulled the reds from the blacks and spliced them together red to red, black to black. Tested and messed with them until I could get both lights to work. Took me a few tries and if you are like me, you'll get one to turn on and you'll have to twist them together to get both to work. I was not able to t tap one of my connections, so I just twisted them together, wrapped with electrical tape, then slid a heat shrink wrap and weather proofed it.
After I seen bI connected to the extra set/long wires, red to red, black to black. Then I tested it see each light turn on. You’ll have to use wire crimp tool and expose the copper by pulling off the protective casing to get a good test. If you've never done that, YouTube/Google it. Pretty standard wire stuff. When you connect the red to the yellow, you'll also connect black to black. The black on the headlamp is the furthest from the yellow. I say this because there's two black wires.
Rinse and repeat for the other side.
If you have a 2.0 like me, there's plenty of room to get the driver's side wire. The passenger side has the air intake that's in the way. Take the extra 10 minutes to remove that. It's 2 bolts for the bar, and then three more bolts plus a screw to remove the intake. Very very easy and worth the effort.
Hopefully my tips save you time because I was lost.


