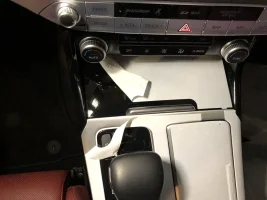
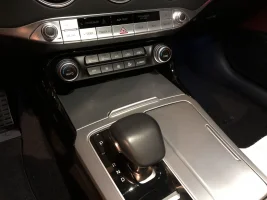
How to install OEM Wireless Charger on your Stinger

I think it’s the only difference. Lol.
Egg, $200ish I’ll just buy these instead and show it off haha... but man did I look at it!
 

Attachments

  • A3E4E759-1FEE-4708-A74C-0C321C916948.webp
    A3E4E759-1FEE-4708-A74C-0C321C916948.webp
    25 KB · Views: 25
Rejoice Stinger community, because alas I can confirm that the Wireless Charging feature (originally removed from the US Spec Stinger) is fully compatible with our cars and it is a PLUG AND PLAY afair.

Here is the step by step guide. I did everything from the passenger side as it allowed me to have more room and not deal with the steering wheel.

These are the tools you need to perform the installation.

1x Ratchet
1x 10mm Socket
1x Rachet extension
1x Plastic panel remover tool (I used two just in case I need more prying power)
1x Phillips Screw driver
1x Flat head Screw driver

Here are the link on where to purchase them
Genuine Aluminum Console Cover & Wireless Charging Pad For Kia Stinger 18 2019+ | eBay

Genuine OEM Mobile Phone Wireless Charging Console Pad For Kia Stinger 18 2019+ | eBay

2XkfMMJ.jpg


The first thing you need to do is remove the center console. This will be a great opportunity to swap over to the KDM version. :sneaky:

I did for this installation

Follow the steps given by Stinger GT and Me's video (Link below)


Once you have removed the center console. You can now proceed with the removal of the shifter (I have a GT2 so this is for the Stinger equipped with the shift by wire option models with out the shift by wire will differ)

There are four (6) screws that need to be undone in order to remove the shifter.
These are three phillips

cq80ur7.jpg

bt2kQV4.jpg

X4kwiAf.jpg


And three 10mm socket

ZHfdxGd.jpg

X4kwiAf.jpg


Once the screws are undone you can now move the shifter freely. Go ahead and unplug it from the harness.

sZWWSe0.jpg


With the shifter out of the way you can now proceed to unscrew the two (2) screws holding down the trim around the climate control.

tHHJ0cf.jpg


Once the screws are removed, you can now proceed with the removal of the beauty panels located on each side of the center console (sorry forgot to take a photo of the drivers side).

6R7MWnQ.jpg


These two panels are held by three (3) clips, that can be seen from the inside of the console.
Using your plastic panel remover tool go ahead and pry the panel out, I had to help myself by pressing on the from the inside out. It made it eaiser. Once you get the first clip out the other two come out easy.

NOTE: Be VERY careful when prying the panel out, it is very thin and can bend easy.

Drivers Side
TAHsP05.jpg


Passenger side
4Ecq0nz.jpg


With the beauty panels removed. You can proceed with the removal of the climate control. No tools required for this step, only brute force and caring.

This is the tricky bit of the hole process, as I spent a considerable amount of time testing different amounts of force to remove it and found that it requires a considerable amount to push it out.

The best way I found to remove the climate control panel, without causing any damage to the buttons or knobs was by pressing down right the two knobs are (on the black part not the knob it self)

JmBoaCj.jpg


You need to press down hard on both side at the same time.

NOTE: See position of the climate control panel on the picture for direction reference.

Now that the son of a gun climate control panel is unhooked, go ahead and unplug it from the harness.

2bgtVjt.jpg


Now we move on to the actual removal of the console.

On this step you will removing five (5) screws, all of them 10mm socket


One right next to where shifter is mounted
OjS8SKW.jpg

Two inside the console itself (there is a small carpet you will need to lift in order to access the screws)
T0zw1EW.jpg

Once on the drivers side (behind the beauty panel)
G6vK6Fj.jpg

Once on the passenger side (behind the beauty panel)
JpFBw7g.jpg


With the screws undone, you will need to disconect the harness for the rear climate control and 12volt plug and USB from the console

AVKLmAv.jpg


Once the harness is disconnected MOVE the hole console backwards just a little bit, just enough to have enough clearance to remove the glossy trim that goes around the climate control panel.

With the console moved and with enough clearance insert you plastic panel removal tool on the back clip. Remember there is one on each side (passenger and driver)

Passenger
qGP6T1I.jpg

93LvLkq.jpg


Driver
oApwaOA.jpg


Now go ahead and remove the panel
cDBktb1.jpg


Next up is the removal of the tray itself, this is the last step and the easiest one as there are no screws to worry about.

Firstly you will notice that the tray is held down only by clips and a small hook on the rear.
mCNihGJ.jpg

s7xyXS7.jpg


To remove the tray somply place your hand underneath the tray and push UP.

8JejVUP.jpg


Once the tray pops out go ahead and pull it towards you, but be careful not to pull to much as there is a harness that needs to be unplugged.

h1DdpSc.jpg

hWitxvI.jpg

VIgc9rE.jpg


Proceed to unplug the two harnesses on the tray.

Now grab your wireless charging tray and plug it in.

L5fxQAQ.jpg

9o7gX1p.jpg


Make sure the hooks on the rear of the tray are IN properly

C43xuKD.jpg


Now press down on the front of the charger until it clips
zb1QNeO.jpg


Looking good so far:geek:
wb4XJqY.jpg


Now you can start putting every back together. Basically following the same steps in reverse order.
NOTE: When putting back the console make sure these hooks go back in correctly other wise you will have fitment issues

sjY4w0s.jpg


Another observation worth noting is the beauty panels also have a hook that needs to sit properly
jpU4DgI.jpg


After everything is put back together you will need to turn on you car and navigate on the center screen on your dash to the Settings menu, then scroll down to Convenience and scroll down until you see Wireless Charging. If that option is enabeled Congratulations!! You have succesfully installed your wireless charger.:thumbup::)

GHwtond.jpg

7ZqpedO.jpg


Hope this helps anyone looking to have this amazing feature enabled on their Stinger.

Finished product with the KDM Console
4QA7hwo.jpg

HRrTNSa.jpg


Rob

Big thanks to @jongkihong for providing the parts extremely fast and in excellent condition.

Here are the link on where to purchase them
Genuine Aluminum Console Cover & Wireless Charging Pad For Kia Stinger 18 2019+ | eBay

Genuine OEM Mobile Phone Wireless Charging Console Pad For Kia Stinger 18 2019+ | eBay
Rob, u da man.

Took me less than 40 minutes because of your awesome guide.

Thanks!!!
 
Just did a 25 minute swap to stock on the old car and am about to tackle the install again on the new one. Super easy to complete... Found you only need to remove the three bolts holding the console down on the gt1 and lower models. Makes it a breeze.

I am considering doing this on my gt... looks like a process with the gt2 ... could you show me what bolts you need to remove for our models? I am not interested in replacing the cup holder and don’t want to take the entire thing apart like the original video shows...
 
From interior to exterior to high performance - everything you need for your Stinger awaits you...
I am considering doing this on my gt... looks like a process with the gt2 ... could you show me what bolts you need to remove for our models? I am not interested in replacing the cup holder and don’t want to take the entire thing apart like the original video shows...
You have to follow the instructions as rob mentioned on the GT2.

Honestly, now that I’ve done it. It would take like 25 minutes or less the second time around. This is the easiest install I’ve done (mustang and stinger). And on the mustang I tore apart doors, dashes, etc.

Robs picture guide is excellent.

And the video of the guy using the trim tool shows how easy it is to remove the center console trim (bunch of pressure clips). You won’t hurt the car.
 
Rob, u da man.

Took me less than 40 minutes because of your awesome guide.

Thanks!!!

You're most welcomed. Glad it was helpful.

I am considering doing this on my gt... looks like a process with the gt2 ... could you show me what bolts you need to remove for our models? I am not interested in replacing the cup holder and don’t want to take the entire thing apart like the original video shows...

Whether you are replacing the cup holder or not you will need to fully remove the piece in order to gain access and replace the factory USB tray with the wireless charging one. That's why many take the opportunity to change the cup holders as well.
 
I want to do this mod, but I have a stock carbon fibre trim center console/slider.

Is there a factory option that I can buy, or is there a way to transplant my slider to the KDM wireless charging piece?
 
I believe I understand your question and the answer is yes. Unfortunately, I did not video the process, but my scenario was this. I had ordered both the OEM wireless charger and cupholder with the brushed aluminum sliding covers and they sent to me the gloss black version for the wireless charger. I had left the protective wrap on until install was completed, so not to scratch the finish. As I began to remove the wrap as you see in the pics, to my surprise I had a gloss black slider. In lieu of returning it, reinstalling my original, and then having to go through the install process a second time once the new charger arrived, I just swapped out the gloss black slider with my original brushed aluminum slider. It wasn't the easiest job due to the internal springs and gears, but with patience and a tad bit of skill, it's a piece of cake. So, yes, you can swap your carbon fiber slider.
2018-09-05 18.14.19.webp 2018-09-05 23.55.37.webp
 
Mine arrived today, super excited. It even showed up a day early. I can't wait to get off work so I can start the install!
 
______________________________
From interior to exterior to high performance - everything you need for your Stinger awaits you...
Does anyone have the part # for the U.S. spec 2019 and 2020 wireless charger/usb/aux tray? Kia USA is showing them for $230 right now, however their images are of the 2018 part. I cannot stand the fact that my IPhone X does not fit anywhere except for the cup holder or sideways under the front lip of the armrest, causing me to have a wire draped over my center console. With the annoyance being somewhat minor, I can’t justify the $330 that everyone is asking, but can somewhat justify the $230. I’ve found them used, but with heavy scratches on the door.

Also, can the doors be easily swapped? Does anyone have a 2018 part sitting around that can check it out for me and let me know if it’s doable? If it is, I’ll just buy a used one and swap my door.
I use a 6” usb to lightning cable and my X kinda rests over the open slot area. It isn’t beautiful but it works for using CarPlay.
 
Does anyone have the part # for the U.S. spec 2019 and 2020 wireless charger/usb/aux tray? Kia USA is showing them for $230 right now, however their images are of the 2018 part. I cannot stand the fact that my IPhone X does not fit anywhere except for the cup holder or sideways under the front lip of the armrest, causing me to have a wire draped over my center console. With the annoyance being somewhat minor, I can’t justify the $330 that everyone is asking, but can somewhat justify the $230. I’ve found them used, but with heavy scratches on the door.

Also, can the doors be easily swapped? Does anyone have a 2018 part sitting around that can check it out for me and let me know if it’s doable? If it is, I’ll just buy a used one and swap my door.
If you have a line on one for $230, I would go for it and swap out the tray door. It's takes a little patience to do so, but it's very doable. I've yet to see a new one for under $330. Good luck!
 
All the pictures I see of the console and/or wireless charging mod are with the GT1/2 shifter. Does anyone know if one or both will work on the Base GT model? Thanks!
 
From interior to exterior to high performance - everything you need for your Stinger awaits you...
I'm thinking about purchasing the Oem wireless charger. Can anyone tell me the length of the charging pad. I just want to make sure my big phone will fit on it thank you.
 
______________________________
I'm thinking about purchasing the Oem wireless charger. Can anyone tell me the length of the charging pad. I just want to make sure my big phone will fit on it thank you.
My samsung note 10+ fits just, when i removed the rubber pad in my 3.3GT awd.
 
Does anyone have the part # for the U.S. spec 2019 and 2020 wireless charger/usb/aux tray? Kia USA is showing them for $230 right now, however their images are of the 2018 part. ...

Did you ever track down part numbers for these? I can't seem to find the specific part number needed anywhere. I'm happy to buy from RPM, Tuscani, or even Khartunerz, but I like to cross shop a bit and if I want to know what the part(s) is going for from a wholesaler.
 
Could someone describe in detail how the climate control panel is removed? Are there any screws holding it in? I've tried pushing directly downward on the control knobs as suggested in the original post, but nothing seems to happen.
Thanks in advance.
 
Could someone describe in detail how the climate control panel is removed? Are there any screws holding it in? I've tried pushing directly downward on the control knobs as suggested in the original post, but nothing seems to happen.
Thanks in advance.
You've just got to push, push down on both knobs to get even distribution. You've got to push harder than you think and it's a little scary but that's the only way it will come out from what I remember.
 
From interior to exterior to high performance - everything you need for your Stinger awaits you...
Back
Top