Manaz
1000 Posts Club!
Let us know how it goes! 

Could certainly do both!I wonder how much good putting some sound deadening mat and foam just on the underside of the trunk floor piece would do? Seems like it would kill quite a bit of noise since it creates somewhat of a sealed barrier between the untreated spare tire area and the rest of the car.
I wonder how much good putting some sound deadening mat and foam just on the underside of the trunk floor piece would do? Seems like it would kill quite a bit of noise since it creates somewhat of a sealed barrier between the untreated spare tire area and the rest of the car.
Roller should do the job of stretching, heat gun shouldn't be needed.Can someone explain the use of the heat gun in this application? The mat isn’t stretchy is it?
View attachment 25151 View attachment 25153 View attachment 25152 Trunk, hatch, floor, front doors (still need to do the rear doors). I also unbolted the exhaust hangers and sandwiched damping material there to lessen energy transfer
Bad idea, as your trying to use sound deadening material as barrier. Get something like MLV/Luxury liner pro for that. 60% coverage of sound deadening on metal surface would rather work better as barrier won't be covering everything.
Reference: Reference Information & Guide – ResoNix Sound Solutions
View attachment 25151 View attachment 25153 View attachment 25152 Trunk, hatch, floor, front doors (still need to do the rear doors). I also unbolted the exhaust hangers and sandwiched damping material there to lessen energy transfer
Roller should do the job of stretching, heat gun shouldn't be needed.
Watch this:
So like the closed cell foam stuff only?
I only ask because I saw a heat gun in RandallK’s photos.

I only ask because I saw a heat gun in RandallK’s photos.
The heat gun helps to make the material more pliable - when it's cold, it can be a bit stiff and hard to get it to form exactly to the shape of what you're trying to attach it to, particularly on complex shapes or sharp bends.
Seems like I might end up using my heat gun for first time.
Haha. Got mine at Harbor Freight on sale for $9. Tinting your side and rear lower reflectors and doing an amber delete on your front turn signals is surprisingly simple with one of these. Much cheaper just to buy some tint film and do it yourself.
I bought mine from there as well. But I think I paid 15. Got it for debadge my car. Never got there though. May be tomorrow I will finally put big stinger embalm.

 Hello all,
View attachment 25507 View attachment 25508 Hello all,
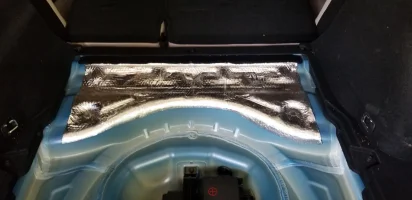
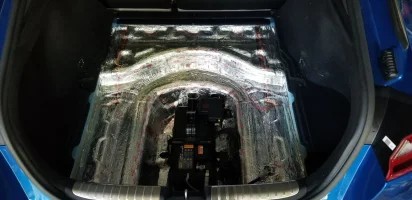
Just sharing my experience with the Noico mats. Purchased at Amazon, including 3 metal rollers to apply the mats and one roll of Noico tape to seal the joints. So far so good. There is a definitive reduction in road noise from the back...sounds more solid, less high frequency noise...now the empty trunk sounds like it is stuffed full with luggage.
The Noico product is easy to install. The product comes folded into thirds (see the product link further up in this thread). I've simply cut one third off, molded the material with the backing paper in place to get an outline where to cut slots to overlap into curves, trimmed the piece to size and then applied it by hand first, making sure there are no air bubbles trapped. If you get a bubble, simply puncture it and squeeze out the air and then patch the place with a bit of Noico tape.
Then apply the roller to bond the material. When the diamond pattern has disappeared the bond is complete. I've then sealed all joints with tape and rolled the tape as well.
What you see in the picture took about 3 hours to do. I did not remove the battery but the harnesses, top brace and the module on the sides.
Next are the side panels. I figure it'll take about 90 minutes each for the wheel well areas behind the side covers.
Awesome!View attachment 25507 View attachment 25508 Hello all,
Just sharing my experience with the Noico mats. Purchased at Amazon, including 3 metal rollers to apply the mats and one roll of Noico tape to seal the joints. So far so good. There is a definitive reduction in road noise from the back...sounds more solid, less high frequency noise...now the empty trunk sounds like it is stuffed full with luggage.
The Noico product is easy to install. The product comes folded into thirds (see the product link further up in this thread). I've simply cut one third off, molded the material with the backing paper in place to get an outline where to cut slots to overlap into curves, trimmed the piece to size and then applied it by hand first, making sure there are no air bubbles trapped. If you get a bubble, simply puncture it and squeeze out the air and then patch the place with a bit of Noico tape.
Then apply the roller to bond the material. When the diamond pattern has disappeared the bond is complete. I've then sealed all joints with tape and rolled the tape as well.
What you see in the picture took about 3 hours to do. I did not remove the battery but the harnesses, top brace and the module on the sides.
Next are the side panels. I figure it'll take about 90 minutes each for the wheel well areas behind the side covers.
