My M&S diffuser will be arriving tomorrow and I plan on installing it myself. My understanding is that it comes with 3M double sided tape and screws. I'm a little hesitant to use the screws but want to make sure it's securely attached. For those of you that have one of these, did you use just the tape or the tape along with the screws. If you used the screws what locations did you use for the screws?
My M&S diffuser will be arriving tomorrow and I plan on installing it myself. My understanding is that it comes with 3M double sided tape and screws. I'm a little hesitant to use the screws but want to make sure it's securely attached. For those of you that have one of these, did you use just the tape or the tape along with the screws. If you used the screws what locations did you use for the screws?
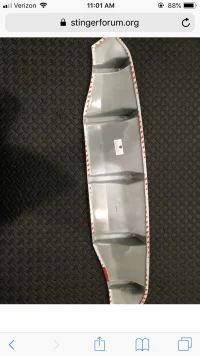
You can place the screws at the back , under the car , not visible from behind . the tape is more than enough , I didnt use the screws personally but did insert 2 rivets ...................take your time , and second pair of hands is very helpful because once the tape goes down , it wont come up easily , and if it does you likely have compromised its adhesive qualities................good luck !
I was going to install mine last weekend but the infamous Importshark painted it the wrong color (asked for Ceramic Silver but got Silky Silver) so I have to get it repainted somewhere else...
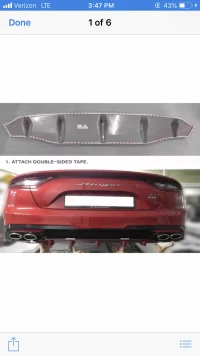
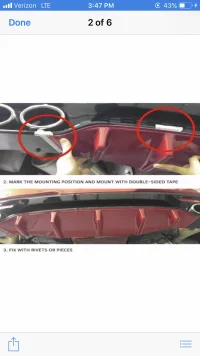
Here are some pics I have gathered to use when it’s time to install and should help you.
I was going to install mine last weekend but the infamous Importshark painted it the wrong color (asked for Ceramic Silver but got Silky Silver) so I have to get it repainted somewhere else...
Here are some pics I have gathered to use when it’s time to install and should help you.
Sorry about the paint mixup but thanks for the pix! I ended up going with Matte Black instead of body color (Ceramic Silver) so let's see what I get tomorrow!
I only used tape. Been up for 1 year, survived a full year of Toronto’s full weather spectrum. Still holding on but who knows if and when the tape will lose its hold.
i got a carbon fiber version as by the time i messed around getting it painted hichroma red it would of been a similar cost so wasn't taking any risks of it falling off so used Sikaflex 227, it was easier to install as it wasnt an instant stick and i could adjust it and held it on with masking tape and a few hours later all done. Sikaflex 227 was recommended by the distributor as in summer with the temp in the 40's quite often and with heat being used to take badges off i thought... nahhhh.
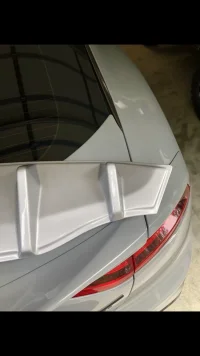
Yesterday i put on some of those rear winglets and used some auto screws, far better and very neat, wish i had thought of it on the diffuser.
just search auto screws or trim panel screws on ebay as i can't add links as im new.
Sorry about the paint mixup but thanks for the pix! I ended up going with Matte Black instead of body color (Ceramic Silver) so let's see what I get tomorrow!
Install went just fine with an extra set of hands like westcoastGT suggested. Just used tape and no screws. Thanks for all the advice and photos of color matched diffusers in another thread. While all of the color matched diffusers looked great I decided to keep it a little more understated with the matte black. On another note to westcoastGT, I think you were right about the matte black. I don't think it was actually painted although I selected that from a dropdown on Importshark's website. It looks fine but I think I might get it vinyl wrapped at some point anyway.
Looks good, glad to hear the install was smooth. I think I’ll use tape only when the time finally comes to install. Getting quotes locally for the paint lol.
Do you have tinted tailights? Think that’s my next mod as I already blacked out the headlight amber and lower rear bumper reflectors.
Nice install Dave !! I actually painted my diff myself , it was an oem color kit with clear coat and was bang on , !! ...........if you arent happy with your color and finish it would be relatively easy to mask and repaint with a flat ( or gloss ) and clear coat to achieve your objective ..........or take the whole rear oem diff off ..................and paint the tips as well ............
The diffuser i got was fibre glass and as such needed a bit of prep work...l did use tape as well as Sikaflex and 2 screws underneath on the front edge..Then l taped it on for a day before i painted it, but after painting l still needed to run a bead along edge to fill in small gap as l couldn't stand looking at that...guess l'm toooo Anal
Nice install Dave !! I actually painted my diff myself , it was an oem color kit with clear coat and was bang on , !! ...........if you arent happy with your color and finish it would be relatively easy to mask and repaint with a flat ( or gloss ) and clear coat to achieve your objective ..........or take the whole rear oem diff off ..................and paint the tips as well ............
I'm sure the tape will suffice , but if the screws are place far enough forward you'll never see them , rivets are a bit more work and you'll need a rivet gun , it leaves a good finish though which I touched up with paint ....................

") so used Sikaflex 227, it was easier to install as it wasnt an instant stick and i could adjust it and held it on with masking tape and a few hours later all done. Sikaflex 227 was recommended by the distributor as in summer with the temp in the 40's quite often and with heat being used to take
so used Sikaflex 227, it was easier to install as it wasnt an instant stick and i could adjust it and held it on with masking tape and a few hours later all done. Sikaflex 227 was recommended by the distributor as in summer with the temp in the 40's quite often and with heat being used to take 


