SKStinger
1000 Posts Club!
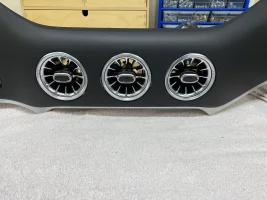
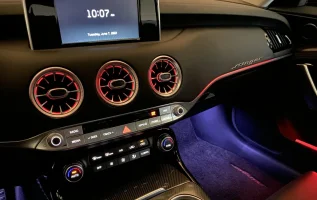
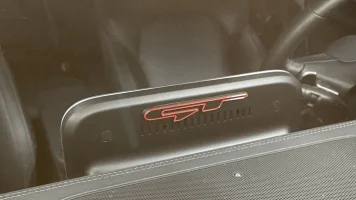
This guide will explain how to modify your new Benz vents so that they can be installed with your existing silver bezels for a nice flush OEM+ appearance as seen below. It also explains the wiring method of re-using the car's LED module for powering and controlling the vent lighting (optional).
Note: reusing the OE bezels will cause you to lose the Benz vents left/right/up/down movement. You can still turn the vents on/off, just not direct the air flow. If this is a show stopper for you, consider gluing them in without the bezels.
Tools you'll need:
Dash Removal: Phillips head screw driver, Plastic trim tool, Cordless drill (optional)
Vents: Dremmel tool with plastic cutting disc, Exacto knife, Small flat head screw driver, Adhesive (super glue, JB Weld, or something similar)
Time investment: I did this over two days to allow for the glue to harden before reinstalling the dash so don't expect to rip through this in a couple hours. Take your time with both the dash removal and the vents. This is not a "rush" project.

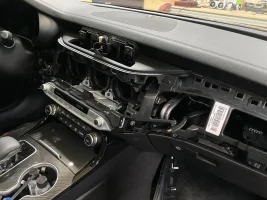
1. Remove the dash. On the back of the dash, i removed the two screws from the cars LED strip module and removed the connector from the side nearest the vents.
This video is super informative and the best i've found to describe the process:
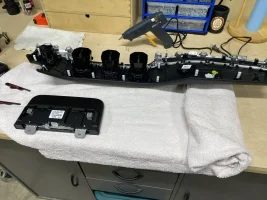
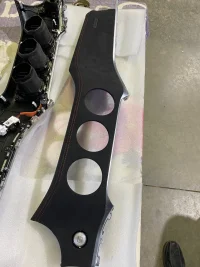
2. Flip your dash upside down and rest it on a towel. Remove the 8 screws holding the vent assembly to the dash and remove the vents from the dash. Pictured is the Genuine Kia Suede dash panel (optional).

3. Remove the old vents from the bracket by prying up the tabs and pulling the vent out. Don't worry if you break these and they do take some force to lift. Disassemble your old vents by using the small flat edge screw driver to lift the tabs on the black portion of the vents first and work your way down to the bezel (last). When the vent looks like this, you've gone far enough:

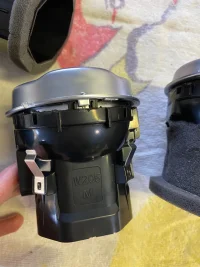
4. Grab one of the Benz vents and using the flat edge screw driver, pry up on the black plastic where it clips onto the chrome bezel. You want to remove the bezel from the vent housing. You can see the small clip on the bezel in the photo below. That is where you need to pry the black plastic up so that they disengage. Don't worry if you damage the bezel, you won't be using it.

5. Using your dremmel, cut off the two long tabs attached to your OE bezel. You can see the one i cut off in this photo below just right of center. Ignore the rest of the photo as that is coming up.

6. Now the fun part! Grab your dremmel and the Benz vent. You need to cut off all four metallic tabs and the two black high ridges. I don't have a photo with them removed but in the photo above, you're cutting off the silver tabs, one on each side of the "W205" and the two on the other side. As well as the black plastic where my fingers are, same on the other side. No need to be super precise, shave them down as close to the vent housing as you can.
You'll notice in the photos below that my vents still have these tabs on them. I cut them off last which is more of a pain so I recommend doing this now. I don't know if all of the silver tabs need to be removed but I didn't want to chance them not fitting so i cut them off. Feel free to experiment though.
7. Using your dremmel again, trim about 1/4" of the black plastic back from the edge of the vent housing all the way around. You can see where i cut and how it's close to the tops of those old clips openings. Use those as your guide to keep you straightish. You'll likely need to trim a bit more but start where I did and work your way back until the OE Bezel seats where you want it.

8. Slide the OE Bezel's black clips under the black plastic of your Benz vent. Ensure you line up the indicator on front side of the OE bezel (a dot with "top" written next to it) with the "Top" markings and center hole for reference on the top of the Benz vent. You can see this mark in the photo in Step 10 below.
You'll know you've trimmed enough plastic when the inside of the vent sits nearly flush with the black plastic inside the chrome bezel. You still want to be able to click the vents on and off so check for free movement. The bezels may want to pop out and that's ok. You'll be gluing them in place when you're happy with the fitment.

9. When everything is lined up and how you want it, place some glue where the clips slide under the black vent housing to secure the bezels in place or wherever you think it will make the best bond.
10. Repeat this process on the other two vents.
I also transferred the foam insulators from my old vents onto the Benz vents. The pieces on the end of the vent and on the bottoms. You can carefully peel them off and the adhesive should stick again to the Benz vents. I'm not sure if this is necessary but i did notice that these new Benz vents don't line up completely flush with the openings inside the car's dash. The foam may help with airflow and reduce any squeeks/noises.

11. Flip you dash upside down and rest each end on something so that the vent holes are off the table. Line up the top of the vent with the top of the dash. Do your best to center them. Ensure the vents are either fully open or closed so that you line them up evenly. They will sort of rest where they fit best but after resting mine in place I lifted the dash over my head a few times to ensure they were evenly set. When you're happy with the placement, glue them down.
Some have chosen to modify the existing black vent bracket. I attempted to do this with my dremmel but it's a fair bit of cutting and is harder plastic so I chose the easy route and glued them in.
12. Wiring. There are several ways to do this. You can use a fuse tap and the car's fuse box, Tap the cars LED wiring harness, or modify the white connectors on the Benz harness and wire it directly to the car's LED harness (the method i chose). The benefits of this method is it allows you to change the colour using the car's infotainment settings rather than the bluetooth app. so your colours will match. The negative is that you won't get as many colours as you're limited to the car's existing options. I also found that the vents are not as bright if you use this method. I actually prefer this because I find them too bright but some may not. The nice things is that this method does not alter your OEM wiring plugs/harness at all so going back to stock is not a problem.
Grab the Y'd wiring harness that has three white connector's on it from your Benz vent kit. The single end will plug into the car's wiring harness that connects to the module on the back of the dash. The Y end will have one connector going to the vents and the other will go to the LED strip on the back of the dash. You will not need the bluetooth/power box that comes with the kit.
13. Using an exacto knife, trim the clip off the top of the white connector that will plug into the car's LED strip. You can remove the LED projector from the dash if you want to help get the connector in snuggly. It just slides back off of the bracket. You can see i've removed mine in the photo.

14. Now grab the other end of the Y harness and trim the "box" off around the pins on the connector that will be going to the car's wiring harness (not the vents). Be carful not to damage the pins! This isn't hard to do with a sharp knife, just take your time and cut the connector down so that all that is remaining are the pins sticking out with no "box" around them. Clip that connector into the car's wiring harness ensuring the wire colours line up. "yellow to orange", "blue to blue" etc. I wrapped the connector in some black electrical tape to keep it secure but it stays relatively tight without it so this is optional.

Your finished harness should look like this:

15. Rout the wiring as neatly as possible behind the dash. Ensure its not going to get squished next to a clip. I bundled up the excess over where the "airbag" portion of the dash is.
16. Test the wiring by plugging the harness back into the car. If it's all working you're set!
Note: if you're installing the alcantara dash, i had to swap my original LED strip module (my old one was black and the new one was white), wiring harness (old was wrapped in black, new was wrapped in orange) and the small LED connector (from step 13) over to the new dash. Prior to doing this the colour's on the strip would not match the car's settings.
17. Reinstall the car's LED strip module on the back of the dash using the two screws and plug the connector in.
18. Reinstall the dash following the video in step 1.

Note: reusing the OE bezels will cause you to lose the Benz vents left/right/up/down movement. You can still turn the vents on/off, just not direct the air flow. If this is a show stopper for you, consider gluing them in without the bezels.
Tools you'll need:
Dash Removal: Phillips head screw driver, Plastic trim tool, Cordless drill (optional)
Vents: Dremmel tool with plastic cutting disc, Exacto knife, Small flat head screw driver, Adhesive (super glue, JB Weld, or something similar)
Time investment: I did this over two days to allow for the glue to harden before reinstalling the dash so don't expect to rip through this in a couple hours. Take your time with both the dash removal and the vents. This is not a "rush" project.
1. Remove the dash. On the back of the dash, i removed the two screws from the cars LED strip module and removed the connector from the side nearest the vents.
This video is super informative and the best i've found to describe the process:
2. Flip your dash upside down and rest it on a towel. Remove the 8 screws holding the vent assembly to the dash and remove the vents from the dash. Pictured is the Genuine Kia Suede dash panel (optional).
3. Remove the old vents from the bracket by prying up the tabs and pulling the vent out. Don't worry if you break these and they do take some force to lift. Disassemble your old vents by using the small flat edge screw driver to lift the tabs on the black portion of the vents first and work your way down to the bezel (last). When the vent looks like this, you've gone far enough:
4. Grab one of the Benz vents and using the flat edge screw driver, pry up on the black plastic where it clips onto the chrome bezel. You want to remove the bezel from the vent housing. You can see the small clip on the bezel in the photo below. That is where you need to pry the black plastic up so that they disengage. Don't worry if you damage the bezel, you won't be using it.
5. Using your dremmel, cut off the two long tabs attached to your OE bezel. You can see the one i cut off in this photo below just right of center. Ignore the rest of the photo as that is coming up.
6. Now the fun part! Grab your dremmel and the Benz vent. You need to cut off all four metallic tabs and the two black high ridges. I don't have a photo with them removed but in the photo above, you're cutting off the silver tabs, one on each side of the "W205" and the two on the other side. As well as the black plastic where my fingers are, same on the other side. No need to be super precise, shave them down as close to the vent housing as you can.
You'll notice in the photos below that my vents still have these tabs on them. I cut them off last which is more of a pain so I recommend doing this now. I don't know if all of the silver tabs need to be removed but I didn't want to chance them not fitting so i cut them off. Feel free to experiment though.
7. Using your dremmel again, trim about 1/4" of the black plastic back from the edge of the vent housing all the way around. You can see where i cut and how it's close to the tops of those old clips openings. Use those as your guide to keep you straightish. You'll likely need to trim a bit more but start where I did and work your way back until the OE Bezel seats where you want it.
8. Slide the OE Bezel's black clips under the black plastic of your Benz vent. Ensure you line up the indicator on front side of the OE bezel (a dot with "top" written next to it) with the "Top" markings and center hole for reference on the top of the Benz vent. You can see this mark in the photo in Step 10 below.
You'll know you've trimmed enough plastic when the inside of the vent sits nearly flush with the black plastic inside the chrome bezel. You still want to be able to click the vents on and off so check for free movement. The bezels may want to pop out and that's ok. You'll be gluing them in place when you're happy with the fitment.
9. When everything is lined up and how you want it, place some glue where the clips slide under the black vent housing to secure the bezels in place or wherever you think it will make the best bond.
10. Repeat this process on the other two vents.
I also transferred the foam insulators from my old vents onto the Benz vents. The pieces on the end of the vent and on the bottoms. You can carefully peel them off and the adhesive should stick again to the Benz vents. I'm not sure if this is necessary but i did notice that these new Benz vents don't line up completely flush with the openings inside the car's dash. The foam may help with airflow and reduce any squeeks/noises.
11. Flip you dash upside down and rest each end on something so that the vent holes are off the table. Line up the top of the vent with the top of the dash. Do your best to center them. Ensure the vents are either fully open or closed so that you line them up evenly. They will sort of rest where they fit best but after resting mine in place I lifted the dash over my head a few times to ensure they were evenly set. When you're happy with the placement, glue them down.
Some have chosen to modify the existing black vent bracket. I attempted to do this with my dremmel but it's a fair bit of cutting and is harder plastic so I chose the easy route and glued them in.
12. Wiring. There are several ways to do this. You can use a fuse tap and the car's fuse box, Tap the cars LED wiring harness, or modify the white connectors on the Benz harness and wire it directly to the car's LED harness (the method i chose). The benefits of this method is it allows you to change the colour using the car's infotainment settings rather than the bluetooth app. so your colours will match. The negative is that you won't get as many colours as you're limited to the car's existing options. I also found that the vents are not as bright if you use this method. I actually prefer this because I find them too bright but some may not. The nice things is that this method does not alter your OEM wiring plugs/harness at all so going back to stock is not a problem.
Grab the Y'd wiring harness that has three white connector's on it from your Benz vent kit. The single end will plug into the car's wiring harness that connects to the module on the back of the dash. The Y end will have one connector going to the vents and the other will go to the LED strip on the back of the dash. You will not need the bluetooth/power box that comes with the kit.
13. Using an exacto knife, trim the clip off the top of the white connector that will plug into the car's LED strip. You can remove the LED projector from the dash if you want to help get the connector in snuggly. It just slides back off of the bracket. You can see i've removed mine in the photo.
14. Now grab the other end of the Y harness and trim the "box" off around the pins on the connector that will be going to the car's wiring harness (not the vents). Be carful not to damage the pins! This isn't hard to do with a sharp knife, just take your time and cut the connector down so that all that is remaining are the pins sticking out with no "box" around them. Clip that connector into the car's wiring harness ensuring the wire colours line up. "yellow to orange", "blue to blue" etc. I wrapped the connector in some black electrical tape to keep it secure but it stays relatively tight without it so this is optional.
Your finished harness should look like this:
15. Rout the wiring as neatly as possible behind the dash. Ensure its not going to get squished next to a clip. I bundled up the excess over where the "airbag" portion of the dash is.
16. Test the wiring by plugging the harness back into the car. If it's all working you're set!
Note: if you're installing the alcantara dash, i had to swap my original LED strip module (my old one was black and the new one was white), wiring harness (old was wrapped in black, new was wrapped in orange) and the small LED connector (from step 13) over to the new dash. Prior to doing this the colour's on the strip would not match the car's settings.
17. Reinstall the car's LED strip module on the back of the dash using the two screws and plug the connector in.
18. Reinstall the dash following the video in step 1.
Attachments
Last edited: