HkS 45IL Gapping

ShaPoopieZ

Active Member
Joined
Sep 20, 2021
Messages
165
Reaction score
106
Points
43
Dang these buggers are fragile.
I just picked up a set of six and all measure .026 to .028.

I'm getting my JB4 today and wanted to have them ready.

Who has a good trick for gapping.
It's such a narrow gap and the electrodes are so small. I may have snapped a tip off one electrode while checking gap. Now I gotta order 1 new plug.
 

I have this one.
 
I just use good old feeler gauges and the tap tap method until they're right.

Many years ago when I worked on Ferrari's, Maserati's Lambo's etc, I used to get stuck doing plugs. 12 per car, 4 cars per day some times.
You learn fast.

Really could have used one of those BMS tools over the years. They look awesome !
 
______________________________
Just got my HHKS M45iL. They are all currently gapped to 0.028-0.029" as received.

The GND electrode on these things is beefy. I tried to bend it with my gapper tool and it just bent the gapper tool. I think I could hear it laughing at me.

I now wish I had bought a good gapper. I don't really want to use the tap tap method so I guess I'm back at inaction until I get a good gapper. Pisses me off because I have everything else out ready to go right now and I can't seem to find somewhere to just drive and pick it up (all shipping).

How noticeable are the misses? Is there any way not to notice it if it is happening?

I can run map 1 and even did a map 2 pull and didn't feel any misses on my stock plugs.
 
Last edited:
Some, if not most, don't regap the HKS plugs.

I did, and I'll explain why: gap opens over time. Better to start slightly tight than near the outside limits of too open.

I gapped to 0.024 FYI.
 
From interior to exterior to high performance - everything you need for your Stinger awaits you...
Thanks for the tip that many don't regap.

I've decided I am not going to install the HKS plugs until I have problems with my existing plugs. It seems to me that missing would be noticeable and I've heard no other argument for replacing the plugs other than that it's become a tribal thing to do.

If this is the wrong stance I am all ears.
Search. Stock plugs can be problematic at stock power levels. Increased power levels, the stock plug can crack and cause issues. It is recommended by every tuner to upgrade the spark plugs for a reason.
 
So searching plugs gets so many results it's not useful. Crack is a good word to assist. Looking at some threads where plugs cracked it seems that stuttering/missing was noticed to indicate a problem and in some cases a check engine light.

Blown out spark is one thing since you can always just drive home off full throttle and deal with it there. Cracked plugs is a good point to raise because you may not be able to get home and so would merit more efforts to prevent it.

I will keep digging.
 
Last edited:
Okay I give in. I'm gapping manually. Put the plug in the socket, place the feelers in the gap @ 0.022" in and tap down with a hammer until the gap won't clear 0.024".
 
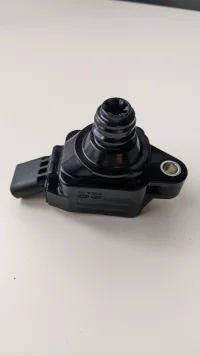
It seems I'm cursed lol. First one the coil separated from the boot at the top. Is this the separation noted by others? The damn boot just doesn't want to budge. Fun.
 

Attachments

  • PXL_20211023_233548386.webp
    PXL_20211023_233548386.webp
    32.6 KB · Views: 11
______________________________
From interior to exterior to high performance - everything you need for your Stinger awaits you...
Not quite how I would do it but see how you go.

I hold the plug upside down and firmly tap the earth arm squarly down on a smooth and solid surface like a concrete floor just enough to narrow the gap. Measure and repeat until you get it right.

Go slow until you get a feel for it.
 
It seems I'm cursed lol. First one the coil separated from the boot at the top. Is this the separation noted by others? The damn boot just doesn't want to budge. Fun.
I'm pretty sure you just grab the remaining stalk with some long nose pliers and wiggle / pull to release it from the plug.
 
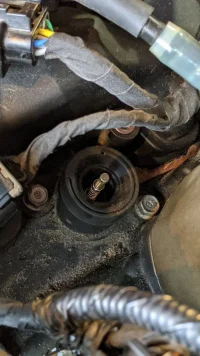
It's in there good. I guess the last person didn't put any lube on it and it's seized to the plug. I'm not sure what to do yet. The last thing I need is for the boot to rip or particularly to tear off at the plug.

How does the coil attach to the boot? Can I reattach it with the boot still in there and put the plug install on hold for a bit? I see a wire sticking out of the boot and where it needs to connect in the coil. Is it just a press connection?
 

Attachments

  • PXL_20211024_211751740.webp
    PXL_20211024_211751740.webp
    172.7 KB · Views: 22
You should be fine to put the coil back on and press it down. Just make sure the everything is aligned and don't use excessive force if it doesn't go easily.

When you do get it all off (eventually), at the time you're putting the stem and coil back on, get some silicon grease and apply a small amount to the inside of the rubber boot that sits on the ceramic part of the plug.

That's where the stem is likely giving you grief.
 
So the boot wire is just a spring induced pressure contact to the coil end? I will put it back on and see how it fires.
 
From interior to exterior to high performance - everything you need for your Stinger awaits you...
Yes.

Whe you do try again to remove the stem, lift up the outer rubber edges and move the rubber away from the plug alley / tube it's in to gently break it free, then use side to side movement of the rubber with tension to break it free from the plug. Also try twisting it. The key is to move as much of the rubber parts as possible without damaging the inner spring stem.

Might be worth buying a spare coil assy just in case.

I think the part number is either 27310 3L000 or 27300 2GGA0
 
Last edited:
______________________________
I appreciate the great assist on this. It's back together and working fine. I will regroup and attack at a later date.
 
Kinda scared me when mine came apart so easily. Everything seems to be fine though.
 
I appreciate the great assist on this. It's back together and working fine. I will regroup and attack at a later date.
No worries.

Was this a 4CYL or 6CYL?

I ask because the part number I gave you for the coil should be for a 6TT but I strongly recommend double checking the part number actually required buying one.
 
6TT
 
From interior to exterior to high performance - everything you need for your Stinger awaits you...
Kia Stinger
Back
Top