You are using an out of date browser. It may not display this or other websites correctly.
You should upgrade or use an alternative browser.
You should upgrade or use an alternative browser.
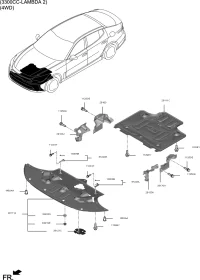
Front undercover engine.......
- Thread starter Dochidalgo
- Start date
mldavis2
1000 Posts Club!
There are six bolts and two push-pins on the bottom cover on the Stinger. They probably lost the push-pins.
Although only Stinger-trained technicians are "supposed" to be working on Stingers at dealerships, the "lube rack" is often manned by new techs or journeymen who are not trained. I always advise the service writer of the amount of oil (I bring my own) it takes, and the number of bolts and pins that must be replaced. I also reset my own service intervals because I don't want untrained techs messing with the computer.
Although only Stinger-trained technicians are "supposed" to be working on Stingers at dealerships, the "lube rack" is often manned by new techs or journeymen who are not trained. I always advise the service writer of the amount of oil (I bring my own) it takes, and the number of bolts and pins that must be replaced. I also reset my own service intervals because I don't want untrained techs messing with the computer.
ShannonC
2500 Posts Club!
- Joined
- May 8, 2018
- Messages
- 2,701
- Reaction score
- 1,905
- Points
- 118
- Location
- North Parramatta, Sydney, Australia
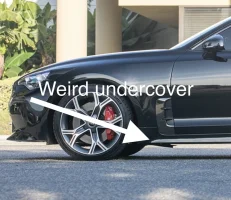
The rear panel is angled down a little and could lead one to believe it isn't fitted correctly. Put your arm under the car and see if it moves.
______________________________
Dochidalgo
Active Member
No, it do not move.The rear panel is angled down a little and could lead one to believe it isn't fitted correctly. Put your arm under the car and see if it moves.
I thought that the Kia mechanic had installed it up side down
Last edited:
Wilzer
Active Member
Forgive my ignorance, please, but does the engine undercover have to be removed for an oil change? One more thing to worry about with routine service, or not.
From interior to exterior to high performance - everything you need for your Stinger awaits you...
ShannonC
2500 Posts Club!
- Joined
- May 8, 2018
- Messages
- 2,701
- Reaction score
- 1,905
- Points
- 118
- Location
- North Parramatta, Sydney, Australia
Forgive my ignorance, please, but does the engine undercover have to be removed for an oil change? One more thing to worry about with routine service, or not.
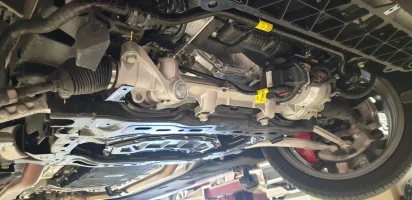
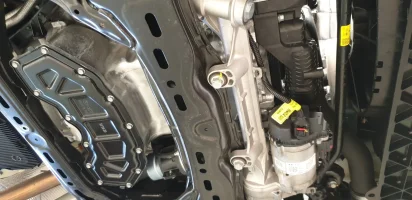
Yes, it comes in two pieces. Oil filter housing is the black part behind sway bar directly above motor for steering so the front tray must come off too.
AV8R
5000 Posts Club!
- Joined
- Dec 13, 2017
- Messages
- 7,325
- Reaction score
- 2,051
- Points
- 118
- Location
- Perth, Western Australia
Well some dealers remove it but there is a round panel that slides to one side and you can get to the sump plug there. When they use that method oil goes everywhere. You have to specifically ask them to remove the complete cover otherwise generally they won’t.Yes, it comes in two pieces. Oil filter housing is the black part behind sway bar directly above motor for steering so the front tray must come off too.
View attachment 23149 View attachment 23150 View attachment 23151
MerlintheMad
10000 Posts Club!
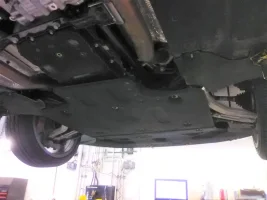
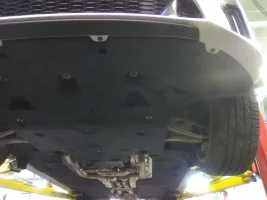
For what it's worth, I had both panels replaced last fall (tore holes/gouges in them!  ). This "hanging down" aspect in the rear (which is held by the six screws) has been noted and talked about before. Some hang down further, from oil getting into the fiberboard, from weathering (already), from backing up and hooking the rear edge and pulling it down, whathaveyou. If it is attached properly (all six [rivets]) there should be no problem.


Last edited:
Dochidalgo
Active Member
robz32
Texas Stinger Swarm
Believe it or not, that is the normal fitment of that panel.
Lots of owners have reported noticing the same. Mine is the same.
Lots of owners have reported noticing the same. Mine is the same.
______________________________
From interior to exterior to high performance - everything you need for your Stinger awaits you...
Dochidalgo
Active Member
Thanks rob....some kind of "aerodynamic effect", perhaps??Believe it or not, that is the normal fitment of that panel.
Lots of owners have reported noticing the same. Mine is the same.
moinmoin
1000 Posts Club!
Happy Easter everybody, and to everybody who's scratching the head in respect to Undercover Panels.
This is my story and I stick to it:
The "Hanging Panel" is normal for the Stinger and requires caution when backing up in snow country - it can catch a load...
There is no round cover for the oil change plug, the panel has to be removed and unless a "downspout" like the Fumoto valve is installed, the outflowing oil will make a mess...
BTW the panel has an oil can embossed on it, right under where the oil plug is situated in the engine above.
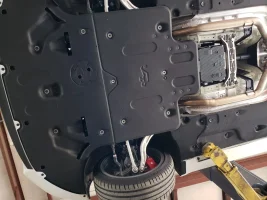
Before treating the car to it's first (what is going to be annual) anti-rust oil spray treatment, I removed all Undercover Panels, power washed, degreased and then painted and waxed them.
The paint used was garage floor paint which in my case had a heave solid content, required because the panel material soaks up liquids like a sponge - which it is basically made of. The color ordered was "Copper", and it turned out to be more on the pinky side. Blame the technician, the car does not mind, after all, "she" is female...
I also took the opportunity - it was actually the MAIN REASON for the whole exercise (painting and changing all panels metal fasteners to stainless steel was only done because of "while you are at it..") to cut an opening port for access to the oil change plug which I had already upgraded to a Fumoto valve on the first oil change @ 800km.
The orientation of the picture below is sideways, therefore the left side points towards the front of the car.
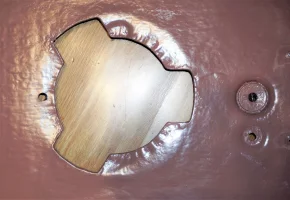
The crimping that is seen here on the panel is not required, it's from my first attempt to use the original cover ( I bought a replacement one from the dealer for $6.00 if you are interested), but it did not work.
I then fashioned a cover from two pieces of aluminum and a spacer approx. 3/16 in thick (should be a bit thicker than the panel material for ease of movement).
I was just winging it and used stuff that I had lying around, such as three sample pieces of counter top material (Formica/Arborite etc) that I epoxied together, observing the natural curl of this stuff and counter gluing accordingly to avoid it becoming an arch... The aluminum was/is about the thickness of the Formica??
The rule to follow is to make a stiff and light assembly. I even cut out most of the spacer, just left enough material for gluing the three pieces together.
The hole placement in the panel is such, that the embossed oilcan is virtually eliminated and there is only a small piece visible due north in the picture, to the right of square "tooth" if you will. It looks like part of the crimping, but it the "dripping oil" you can see in the top picture of the Stinger's underside.
I painted the cover to protect the aluminum from the elements:
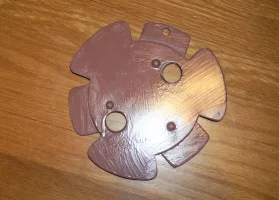
Three pieces of material, one shaped with ONLY the large "petals or teeth", one shaped ONLY with the small "petals or teet" and the completely circular spacer a little bit smaller than the actual hole in the panel. The finger holes are positioned the same as the OEM cover, which also aids in the registration of the parts (which is a little bit off in my case - so sue me lol). Epoxied it all together and for good measure added 5mm 1/2in SS bolts.
Here the side view:
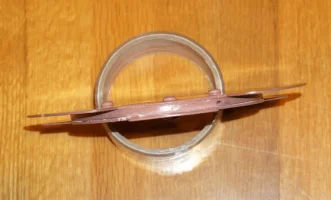
It's fixed in the cover the same way as the "oil filter cover", with a plastic pin.
BTW somewhere on the forum it was stated - in connection with the mounting of mud guards - that the plastic fixing pins are for one-time-use only. No idea where that comes from. Not are the fairly expensive to purchase and not every dealer carries them ALL THE TIME, but yes they can and will be re-used, as other shops than KIA do not carry them.
Anyway, that's how the panel with the new access hole and cover looks assembled:
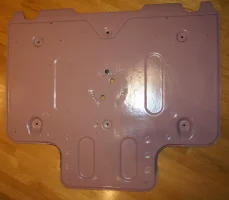
This project was finished late fall early winter and we have since made a return trip to Florida, adding some 5000 km to the distance traveled. I am now at 17000km +, had an oil change and brake service about 4 weeks ago. Oil change was a pleasure for the technician: He only had to pull the plastic pin, remove the cover and open the valve with one finger after placing the funnel under it.
No fuss, no mess.
BTW you may notice 2 vertical rows of 3 rivets each on the bottom "hanging" part of the panel above: that was my attempt to stiffen that thing and reduce the sagging.
There are more rivets, not as obvious because I used existing holes.
It worked in a fashion and improved a little.
We'll see ,,.
That's all for now
This is my story and I stick to it:
The "Hanging Panel" is normal for the Stinger and requires caution when backing up in snow country - it can catch a load...

There is no round cover for the oil change plug, the panel has to be removed and unless a "downspout" like the Fumoto valve is installed, the outflowing oil will make a mess...
BTW the panel has an oil can embossed on it, right under where the oil plug is situated in the engine above.

Before treating the car to it's first (what is going to be annual) anti-rust oil spray treatment, I removed all Undercover Panels, power washed, degreased and then painted and waxed them.
The paint used was garage floor paint which in my case had a heave solid content, required because the panel material soaks up liquids like a sponge - which it is basically made of. The color ordered was "Copper", and it turned out to be more on the pinky side. Blame the technician, the car does not mind, after all, "she" is female...
I also took the opportunity - it was actually the MAIN REASON for the whole exercise (painting and changing all panels metal fasteners to stainless steel was only done because of "while you are at it..") to cut an opening port for access to the oil change plug which I had already upgraded to a Fumoto valve on the first oil change @ 800km.
The orientation of the picture below is sideways, therefore the left side points towards the front of the car.

The crimping that is seen here on the panel is not required, it's from my first attempt to use the original cover ( I bought a replacement one from the dealer for $6.00 if you are interested), but it did not work.
I then fashioned a cover from two pieces of aluminum and a spacer approx. 3/16 in thick (should be a bit thicker than the panel material for ease of movement).
I was just winging it and used stuff that I had lying around, such as three sample pieces of counter top material (Formica/Arborite etc) that I epoxied together, observing the natural curl of this stuff and counter gluing accordingly to avoid it becoming an arch... The aluminum was/is about the thickness of the Formica??
The rule to follow is to make a stiff and light assembly. I even cut out most of the spacer, just left enough material for gluing the three pieces together.
The hole placement in the panel is such, that the embossed oilcan is virtually eliminated and there is only a small piece visible due north in the picture, to the right of square "tooth" if you will. It looks like part of the crimping, but it the "dripping oil" you can see in the top picture of the Stinger's underside.
I painted the cover to protect the aluminum from the elements:

Three pieces of material, one shaped with ONLY the large "petals or teeth", one shaped ONLY with the small "petals or teet" and the completely circular spacer a little bit smaller than the actual hole in the panel. The finger holes are positioned the same as the OEM cover, which also aids in the registration of the parts (which is a little bit off in my case - so sue me lol). Epoxied it all together and for good measure added 5mm 1/2in SS bolts.
Here the side view:

It's fixed in the cover the same way as the "oil filter cover", with a plastic pin.
BTW somewhere on the forum it was stated - in connection with the mounting of mud guards - that the plastic fixing pins are for one-time-use only. No idea where that comes from. Not are the fairly expensive to purchase and not every dealer carries them ALL THE TIME, but yes they can and will be re-used, as other shops than KIA do not carry them.
Anyway, that's how the panel with the new access hole and cover looks assembled:

This project was finished late fall early winter and we have since made a return trip to Florida, adding some 5000 km to the distance traveled. I am now at 17000km +, had an oil change and brake service about 4 weeks ago. Oil change was a pleasure for the technician: He only had to pull the plastic pin, remove the cover and open the valve with one finger after placing the funnel under it.
No fuss, no mess.
BTW you may notice 2 vertical rows of 3 rivets each on the bottom "hanging" part of the panel above: that was my attempt to stiffen that thing and reduce the sagging.
There are more rivets, not as obvious because I used existing holes.
It worked in a fashion and improved a little.
We'll see ,,.
That's all for now
Last edited:
Dochidalgo
Active Member
Happy Easter for you too, moinmoin
Excellent job.
Excellent job.
OliverNuther
1000 Posts Club!
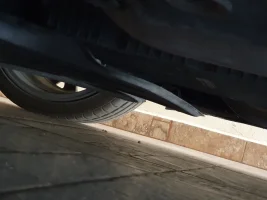
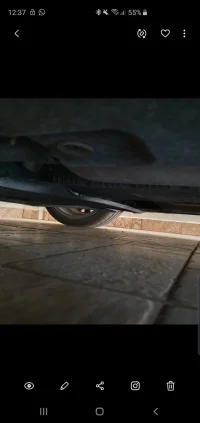
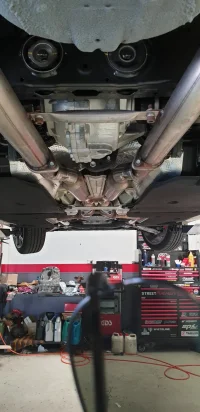
I borrowed the wife's selfie stick..View attachment 23192 View attachment 23193 View attachment 23194
Finally, a legitimate use for a selfie stick.
Dochidalgo
Active Member
JajajaFinally, a legitimate use for a selfie stick.
I could not be more agree with you
From interior to exterior to high performance - everything you need for your Stinger awaits you...
MerlintheMad
10000 Posts Club!
I think the trailing edge looks lower than it should be. Can you get a closer look underneath, to see if the six [rivets] are all in place?I appreciate your comments about my car issue. Specially to Mr. Merlinthemad for the pictures.
I borrowed the wife's selfie stick today and I take these pictures to show my concern about that rear "lip"....View attachment 23192 View attachment 23193 View attachment 23194
Last edited:
______________________________
MerlintheMad
10000 Posts Club!
Ah, rivets, not "screws". Small detail. They need to be in place, regardless.BTW you may notice 2 vertical rows of 3 rivets each on the bottom "hanging" part of the panel above:
Wilzer
Active Member
Moinmoin, if you lived in Florida, no one would see the "pink" underside except the armadillos 


