
You are using an out of date browser. It may not display this or other websites correctly.
You should upgrade or use an alternative browser.
You should upgrade or use an alternative browser.
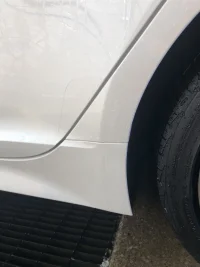
Clear decals/ protective covering on rear door bottom?
- Thread starter CoachTG
- Start date
westcoastGT
5000 Posts Club!
yes , most newer higher end cars have themAnyone know the purpose of these clear decals/coverings? I’m assuminh it’s for some sort of protection on both rear door/panel bottoms? Should they be removed?
MerlintheMad
10000 Posts Club!
But NO, do not remove them. They are paint protection film and they are not cheap. If you peel them off and repent, it'll cost you in the neighborhood of fifty bucks, just for one side. (You don't need to ask how I know.  )
)
) ______________________________
nhcowboy28
2500 Posts Club!
- Joined
- Oct 30, 2018
- Messages
- 3,500
- Reaction score
- 2,697
- Points
- 118
- Location
- None of your damn business
I agree it is ppf, but that is the ONLY place my car has them.But NO, do not remove them. They are paint protection film and they are not cheap. If you peel them off and repent, it'll cost you in the neighborhood of fifty bucks, just for one side. (You don't need to ask how I know.
Not the front facia, hold? Front fenders, behind the front wheels/vent.
Totally stooopid on the back in front of rear wheels.
TwiceStung
Stinger Enthusiast
Not stupid when you get most of your road debris thrown there and this film helps protect the paint.
From interior to exterior to high performance - everything you need for your Stinger awaits you...
TwiceStung
Stinger Enthusiast
I’m sure someone did a study to see where the most debris usually hits. My 2012 Outback has similar placements but they don’t look as nice.
MerlintheMad
10000 Posts Club!
I bet that under "spirited" acceleration, the front wheels on an AWD "spit" pebbles back there and hit the flare in front of the rear wheels.Thanks everyone. I agree, why not have them in more places then? Even though they seems to be in high risk areas.
I have seen other judicious application of PPF on cars at the dealership. Half hood, full front bumper, partial bumper, rear bumper below the hatch lid, etc. Individual cars get different treatment. The three patches, as far as I know, are on all AWD vehicles. I don't know about RWD.
westcoastGT
5000 Posts Club!
they are placed exactly where the vents behind the front wheels throw debris , I know from experience !I agree it is ppf, but that is the ONLY place my car has them.
Not the front facia, hold? Front fenders, behind the front wheels/vent.
Totally stooopid on the back in front of rear wheels.
nhcowboy28
2500 Posts Club!
- Joined
- Oct 30, 2018
- Messages
- 3,500
- Reaction score
- 2,697
- Points
- 118
- Location
- None of your damn business
Stop off roading your stingers you heathens.they are placed exactly where the vents behind the front wheels throw debris , I know from experience !
______________________________
From interior to exterior to high performance - everything you need for your Stinger awaits you...
NS_Stinger
2500 Posts Club!
- Joined
- Jun 14, 2018
- Messages
- 2,524
- Reaction score
- 1,553
- Points
- 118
Those front fender vents have a strong stream of air flowing out of them when the car is at speed and the stream carries dirt, sand and road debris. The area with the ppf just happens to be the first obstacle that stream runs into.
TwiceStung
Stinger Enthusiast
I have a RWD and the same patches are used.I bet that under "spirited" acceleration, the front wheels on an AWD "spit" pebbles back there and hit the flare in front of the rear wheels.
I have seen other judicious application of PPF on cars at the dealership. Half hood, full front bumper, partial bumper, rear bumper below the hatch lid, etc. Individual cars get different treatment. The three patches, as far as I know, are on all AWD vehicles. I don't know about RWD.
NS_Stinger
2500 Posts Club!
- Joined
- Jun 14, 2018
- Messages
- 2,524
- Reaction score
- 1,553
- Points
- 118
Doesnt matter if you have AWD or RWD the front tires still kick debris up into that vent and the air stream pushes it down along the side of the car.
westcoastGT
5000 Posts Club!
what ?? but I have AWD !! geez nobody told me !! BawaaaaaStop off roading your stingers you heathens.
With all the salt build up these patches became really apparent, so without further ado I set about removing them along with a large number of protective plastic coverings on the interior that the dealer had left on.
First piece came of real easy then the next was tough - at that point cold sweats started as I realized I perhaps should not be removing them!
The long and short of it, to anyone else doing the same, where did you get the protective covering replaced? Did the dealer replace it?
I only did one side so if it costs me $50 to correct I think that's not going to hurt too much...
Steve
From interior to exterior to high performance - everything you need for your Stinger awaits you...
MerlintheMad
10000 Posts Club!
Yep. Fifty bucks, give or take. Glad you didn't peel the other side off! Putting my own replacement "patches" on convinced me that no way was I going to attempt my own PPF install.With all the salt build up these patches became really apparent, so without further ado I set about removing them along with a large number of protective plastic coverings on the interior that the dealer had left on.
First piece came of real easy then the next was tough - at that point cold sweats started as I realized I perhaps should not be removing them!
The long and short of it, to anyone else doing the same, where did you get the protective covering replaced? Did the dealer replace it?
I only did one side so if it costs me $50 to correct I think that's not going to hurt too much...
Steve
 Just those tiny patches nearly got out of hand. There are a couple of tiny (and I do mean really small) flaws; I know they're there. But nobody could see them unless they got up really close, looking for flaws.
 ______________________________
Thanks MerlintheMad
Found the 3 parts online and have ordered them, with delivery just over $50.
Well I wanted an excuse to spend time with the Stinger, guess it'll now be a few hours of stress trying not to trap bubbles!
For anyone else these are the part numbers for the right hand side (passenger) - 84127J5000, 84221J5000, 87766J5300
Steve
MerlintheMad
10000 Posts Club!
It doesn't take anywhere near that long. I may have mixed the isopropyl alcohol wrong (thought I read how much carefully), but soaking down the area and the patches, and making sure they were in place, then squeegeeing them center to edge (like I had been tutored online), I found them sticking such that I could no longer peel them up far enough to get to the few trapped air bubbles. What to do!? I took a needle to them, and pressed trapped air and solution out as much as possible. Then over the next few days I obtained a syringe to insert in the base of each bubble and draw out the liquid. But wonder of wonders, when I went back to do the deed, every one of the little blighters had disappeared. I surmised that the needle pricks in the top/center of each former bubble had allowed the moisture to evaporate, thus solving the problem entirely for me.Well I wanted an excuse to spend time with the Stinger, guess it'll now be a few hours of stress trying not to trap bubbles!


