-

-
Prefer a New Age Social Media layout? CLICK HERE! (This message can be dismissed by clicking the X in the right corner)
Social Feed
What's on your mind?
We're testing a new feature that'll allow those who prefer it to experience and participate in a format similar to new age Social Media sites.
For everybody else, there's always the legacy version.
If you prefer to browse through discussions instead of topic titles, and post, react, and participate all on a single page - here it is:

 stingerforum.org
Please report any bugs and let me know if you need any improvements. Thank you!
For everybody else, there's always the legacy version.
If you prefer to browse through discussions instead of topic titles, and post, react, and participate all on a single page - here it is:
Social Feed
stingerforum.org
Please report any bugs and let me know if you need any improvements. Thank you!
0 replies
·
14 views
replies
Legacy View

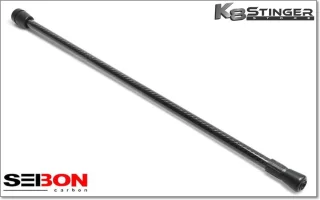
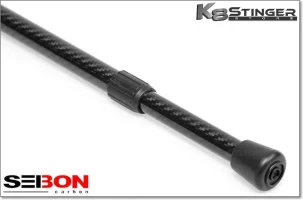
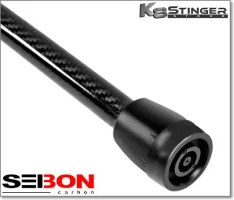
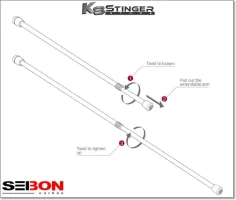
Is proud to bring to the Stinger community
Seibon Carbon Fiber Hood Prop
(BUY NOW)
Description:
The days of using a broomstick to hold your hood or trunk open are over!
Seibon Carbon introduces the very FIRST and ONLY carbon fiber hood/trunk prop in the automotive industry.
This hood/trunk prop can extend up to 50’’ inches to provide as much clearance and “playing” room as possible.
The hood/trunk prop is made with the same high-standard that Seibon Carbon uses to make all of its products.
So you say, why can't I just use the same mechanism that holds open my Stinger's stock hood?
Carbon fiber hoods and trunks are usually much lighter in weight than their stock counterparts.
As a result, the shocks/dampers/struts/springs that are used with original metal pieces have stronger pressures than what's necessary for a carbon fiber piece.
Customers are advised NOT to use OEM mechanisms, because they may prevent your hood from closing & may cause carbon products to crack from over-pressure.
Specifications:
Manufactured by Seibon from the highest grade carbon fiber raw material available
6-month limited clear coat warranty from Seibon
Very nice attractive sleek & glossy finish
Vehicle Applications:
Universal (Works with all vehicles)


THANK YOU FOR LOOKING!
1 replies
·
765 views
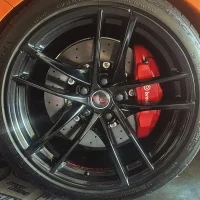
I recently installed a carbon ceramic brake rotor setup from Jisu Sports as part of my ongoing effort to build what I consider the ultimate Stinger GTS. I’ve been driving on just the front CCB for the last couple months and just got the rears fitted. For context, I’ve previously run the Fella setup on this car, and before that EBC two-piece front rotors. Both of those setups were solid and performed well, good bite, good heat management, and overall a noticeable upgrade over OEM. That said, this carbon ceramic setup is on a completely different level.
Beyond just the raw stopping power, the biggest improvement is in vehicle dynamics. The reduction in unsprung and rotational mass is immediately apparent. Turn-in is sharper, front-end response is quicker, and the car feels way more composed under hard braking and trail braking. With less rotating mass at each corner, the suspension can do its job more effectively, improving mid-corner stability and overall chassis control. Pedal feel remains so much more consistent even after repeated heavy braking, and brake fade is essentially nonexistent, and confidence in high-speed braking zones is significantly improved. There’s also a subtle but real benefit to acceleration due to reduced rotational inertia, no numbers but you can definitely feel it.
One bonus that matters more than I expected: THEY DON’T RUST. Surface rust on iron rotors has been a long-standing pet peeve of mine across multiple vehicles, and it’s refreshing to have a setup that stays clean and consistent without the usual corrosion issues. So this wasn’t a cosmetic upgrade just it fundamentally changed how the car behaves. The focus of this build has always been balance, control, and repeatable performance, not just horsepower numbers. This setup feels like a major step toward the GTS the platform always deserved.
Happy to answer questions or share more details if anyone’s considering going this route. Here is the link to my supplier, the representative Yilia Liu was super responsive and friendly and helped with every step of the process.
6 replies
·
173 views

Hey Max here. Just signed up for the forum . I made a mistake and bought the wrong size rim for my 2020 Stinger it’s 19” OEM if anyone’s interested in needed a spare rim feel free to send offers .
Just trying to get rid of it since I ordered the correct part and can’t send the old one back.
I will provide all the paperwork/ pictures you need to inspect the Wheel .
Thanks and looking forward to making more posts about my upgrades & Mods.
Just trying to get rid of it since I ordered the correct part and can’t send the old one back.
I will provide all the paperwork/ pictures you need to inspect the Wheel .
Thanks and looking forward to making more posts about my upgrades & Mods.
5 replies
·
44 views
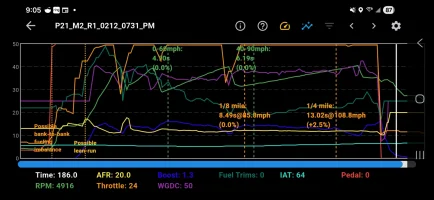
2020 KIA Stinger GT2
Here are my specifications:
- K&N CAI
- MBRP catback exhaust
- DC Sports Mid pipes
- Single ADD W1 Catch Can
- JB4 with EWG wires and fuel wires (JB4 was recently installed on January 31, 2026)
- Brand new ignition coils
- Brand new HKS plugs gapped to 0.022
- I only use 94 octane or 93, no lower
- Running MAP 1
I spoke to Terry at Burger Motorsport, and honestly, he wasn’t very helpful. He was extremely vague and told me to change FF from 50 to 30. All his emails were also vague and didn’t provide much help in diagnosing my issue. So, I’m reaching out to you all to see if you can assist me.
I want to avoid going to a dealership and fix it myself if possible.
For a while now, I’ve been experiencing issues where, around 2,000 rpm or a little less, the car would randomly enter some type of limp mode or protection mode. It barely allowed me to accelerate, even if I floored the gas pedal. Additionally, it would display a CEL. When I scan the car right when it comes on, no errors are shown. Even after turning the car off and on in accessory mode, as recommended, there are still no errors. However, when I turn the car all the way over, the engine light goes off, and everything returns to normal until it happens again.
I read that changing the ignition coils and spark plugs should fix the issue, but it didn’t. I changed both together and gapped the plugs (0.022).
Now, I’m undergoing some testing, and Terry told me to adjust the FF/Wastegate from 50 to 30. That seemed to help quite a bit because it was happing more frequent if I remember correctly! However, I can still get it to happen if I do a spirited drive, then slow down to come to a stop. Then, I accelerate normally, but if I take my foot off the gas pedal to slow and and let the RPMs drop to around 2,000 rpm or a little lower, and then accelerate normally to get the car to move forward more, the car will cut a lot of power. This results in a CEL, forcing me to pull over, turn the car off, and then turn it back on again.
I’ve tried recreating it by getting to those low rpms without accelerating hard beforehand, but I couldn’t reproduce the problem.
Today, I tested again, but this time I set JB4 to map 0. I drove for an hour, spirited here and there when I could and testing it often as I lowered the rpms to around 1,500-2,000, trying to recreate the issue. However, it didn’t happen once. Everything felt fine and as it should.
I need your input on this. Is there a setting in JB4 that I can adjust to help more?
The settings in JB4 were actually set as recommended on the website where I purchased the EWG wires. Here are the settings I have set to:
- Duty Bias: All to 50
- FF/Wastegate: 30 (was set to 50)
- PID gain: 20
- Auto shift reduction: 60
I was able to log it one time when I sent it to Terry. Not sure if it helps or not. But it did happen when I was logging. He wasn’t clear from this log what the issue is…
0 replies
·
44 views
replies
Legacy View
Hi everyone,
I recently got a 19' GT1 AWD, and I have the BMS 450WHP kit, and a TiAL BOV, with the BMS adapter and I was wondering if this looks good for a 1/4-mile run. I have been reading into the expected boost levels and was wondering if these logs look alright or not. Any help is greatly appreciated.
I recently got a 19' GT1 AWD, and I have the BMS 450WHP kit, and a TiAL BOV, with the BMS adapter and I was wondering if this looks good for a 1/4-mile run. I have been reading into the expected boost levels and was wondering if these logs look alright or not. Any help is greatly appreciated.
0 replies
·
17 views
replies
Legacy View
With the Stinger's release right around the corner, Post pics and give updates of what you did to your Stinger. From a simple car wash to installing aftermarket items. Andddddd go!
There's lots of mods and upgrades to be seen at KDM Warehouse!

 kdmwarehouse.com
There's lots of mods and upgrades to be seen at KDM Warehouse!
Kia Stinger
K Stinger badges, emblems and lots of other items. High performance and cosmetic modifications made specifically for your Kia Stinger.
kdmwarehouse.com
15150 replies
·
2404124 views
What do you think my whp/wtq numbers are (should be) with the mods below.
2019 3.3 GT AWD
Mods:
")
2019 3.3 GT AWD
Mods:
- Injen Intakes
- Magnaflow Exhaust
- Ark Performance Secondary Downpipes
- WMI Kit (Upgraded Lines, BM10 Injection Nozzle)
- Mishimoto Intercooler
- HKS Plugs
- ECU Dyno Tune For 93 Octane
- JB4 Tune for WMI
- JB4 EWG Add On Connectors
11 replies
·
355 views
Is excited to present to the Stinger forums:
3.3T - Jun Bl Racing Catback Exhaust System
(BUY NOW)
Description:
The Jun Bl Racing Catback Exhaust System for the Kia Stinger 3.3T is a 100% perfect bolt-on system that requires no modification or welding at all
This replaces the OEM exhaust directly and squeezes all available horsepower from your 3.3T Stinger engine while also increasing torque
Jun Bl's exhaust design produces a deep growling and aggressive sound all the way up through redline
Truly among the best exhaust systems on the market for the Kia Stinger
Vehicle Applications:
2018-2023 Kia Stinger 3.3T (All Trims)
2018-2021 Kia Stinger 2.0T: (FOUND HERE)
Additional Information:
True quad-outlet dual exhaust which fits with stock exhaust tips
Dyno-proven +30.1 horsepower at 4400 rpm & +5.0 torque at 4400 rpm
Polished stainless steel construction (SUS-304)
Professionally TIG-welded, 3D bending
All hardware necessary for install included
Inlet pipe size: Φ60.5x2 mm
Mid pipes size: Φ60.5x2 mm
CNC-machined flanges


THANK YOU FOR LOOKING!
9 replies
·
3838 views
Some people may have come across my thread about the ADD W1 Dual Inlet (v3.3) check valves failing, which led to a vacuum leak, if not you can find that thread here: Vacuum Leak? Check your catch can
I reached out to ADD W1 support on 6/3 and was told that perhaps the valve was defective and that they would send out a replacement. As of today, 6/14 I haven't received the replacement. Now, this isn't a thread to bash ADD W1, i've used their catch cans in previous vehicles with no issues.
However, when the check valves blew and causing me to go on a wild goose chase for the vacuum leak, I couldn't help but think that the check valves are the weak leak. They're aluminum, so they're light, but the check bearing open and close with little pressure. I took that to mean that when you introduce boost into the equation, they were simply overwhelmed.
Now let's put things in context, I do have a JB4 and when the check valves failed I was on the dyno. So that means that I am running more boost and the check valves were under high stress during dyno testing. Perhaps I found the weak link on that day, perhaps the valves were just defective, or maybe the valves just weren’t designed to be used in a modified environment.
Regardless, I managed to dodge a bullet because when the bearings let loose, it could've resulted in catastrophic engine failure. Given that I managed to escape once, I did not want to chance it with the possibility that the valves would fail again and maybe I wouldn't be quite so lucky. So even if ADD W1 had sent the replacement valves, I probably wouldn't have installed them.
I began looking into replacement check valves, which could support oil - this is an important distinction because all check valves cannot. I reached out to a local performance shop, told them about the issue and they recommended a company they use for all of their various valves and fittings, McMaster-Carr.
Now these valves are beefy and unlike the ADD W1 valves, which open at about 0.1psi, they do not open until 1psi (i.e. you're in boost and this is the time you want to prevent that oil blow-by).
I ended up going with McMaster-Carr product 7768K53 (Compact Backflow-Prevention Valve for Oil and Fuel, 3/8 NPT Female x 3/8 NPT Female), which were $19.99/each. They have a max operating pressure of 500 psi...if I blow these then I have larger issues.
Keeping inline with my desire to make this the last time I address this problem, I decided in addition to upgrading the check valves, I would also change out all the plumbing to AN braided lines instead of the rubber stuff that comes with the ADD W1.
Why AN? Because they provide a leakproof seal. Granted, nothing was technically wrong with the hoses and clamps provided by ADD W1 but AN is the way to go if you really want to do things once.
ADD W1 offers AN fittings on their site, -10AN and -8AN. For the 3.3TT we technically need -8AN and -6AN given the hose diameter for the ADD W1 catch can. Why didn't I order these fittings from elsewhere? Simple, the ADD W1 can does not take the standard 3/8" fitting or an ORB (o-ring boss) fitting, and they're certainly not an AN fitting. How do I know? Because I spun my wheels on several fittings before heading over to the ADD W1 website.
I figured i'd order four -8AN fittings and once they arrive i'll just use an -8AN to -6AN reducer, which should work fine. While I was ordering, I figured i'd opt for the oil drain valve since who wants to unmount the can each time it needs to be drained??
Naturally, you'll also need the appropriate -8AN and -6AN braided hoses and fittings are well, but you can source these from Amazon, Jegs, or Summit Racing.
The ADD W1 AN fittings arrive and to my dismay, they were loose. They did not fit the catch can snugly.
I pull out the digital caliper and now I see the difference.
The fittings the come with the ADD W1 are 16MM


The AN fittings on the ADD W1 site are about 15.6MM which is just enough for them not to fit snugly and while you could use teflon tape to try to take up the slack, they simply would not torque down to provide an airtight seal, which defeats the purpose of this project if that critical part — eliminating possible vacuum leaks — couldn't be done.
The -8AN to -6AN reducer is on one of the fittings just so you could see it


Armed with this information, I went off to find -8AN to 16MM (Russell 670550) and -6AN to 16MM (Russell 670530) fittings, which I found on Summit Racing, which should fit plenty snug


Prior to install, I used some Vibra-TITE on the threads. I prefer Vibra-TITE to Loctite for several reasons, but chiefly because with Vibra-TITE you can reposition the bolt without needing to reapply and the application is seamless unlike Loctite which just drips all over the place. Apply Vibra-TITE to the threads, it becomes dry to the touch in about a minute, and it's ready to install after 10 minutes.
If you're in a bind, Loctite would do, but use 242 blue as opposed to the permanent red.


Here are the McMaster-Carr check valves with the 3/8 NPT to -8AN Russell fittings attached to -8AN hoses that I made.

Here you can see the two -8AN to 16MM fittings leading to the -8AN hoses and the -6AN to 16MM fitting leading to the -6AN hose

Used an AN hose separator to keep everything tidy

-8AN hose finisher going to the intake (it just looks cleaner than a spring or worm clamp)

We're all buttoned up

Lastly, you see the rubber drain hose. I can quickly get a cup underneath and flip the valve to drain the oil from the can.

I would strongly recommend, at a bare minimum, upgrading your check valves. You don’t have to go full on with AN fittings and braided hoses like I did, it’s overkill for this application...but it does look nice.
You can simply get the McMaster-Carr check valves and four 3/8 NPT to 1/2” barbs to swap out the ADD W1 check valves and not touch anything else to achieve the same result without the AN hoses and fittings. I would also opt for some spring clips or solid worm clamps just for peace of mind.
I reached out to ADD W1 support on 6/3 and was told that perhaps the valve was defective and that they would send out a replacement. As of today, 6/14 I haven't received the replacement. Now, this isn't a thread to bash ADD W1, i've used their catch cans in previous vehicles with no issues.
However, when the check valves blew and causing me to go on a wild goose chase for the vacuum leak, I couldn't help but think that the check valves are the weak leak. They're aluminum, so they're light, but the check bearing open and close with little pressure. I took that to mean that when you introduce boost into the equation, they were simply overwhelmed.
Now let's put things in context, I do have a JB4 and when the check valves failed I was on the dyno. So that means that I am running more boost and the check valves were under high stress during dyno testing. Perhaps I found the weak link on that day, perhaps the valves were just defective, or maybe the valves just weren’t designed to be used in a modified environment.
Regardless, I managed to dodge a bullet because when the bearings let loose, it could've resulted in catastrophic engine failure. Given that I managed to escape once, I did not want to chance it with the possibility that the valves would fail again and maybe I wouldn't be quite so lucky. So even if ADD W1 had sent the replacement valves, I probably wouldn't have installed them.
I began looking into replacement check valves, which could support oil - this is an important distinction because all check valves cannot. I reached out to a local performance shop, told them about the issue and they recommended a company they use for all of their various valves and fittings, McMaster-Carr.
Now these valves are beefy and unlike the ADD W1 valves, which open at about 0.1psi, they do not open until 1psi (i.e. you're in boost and this is the time you want to prevent that oil blow-by).
I ended up going with McMaster-Carr product 7768K53 (Compact Backflow-Prevention Valve for Oil and Fuel, 3/8 NPT Female x 3/8 NPT Female), which were $19.99/each. They have a max operating pressure of 500 psi...if I blow these then I have larger issues.
Keeping inline with my desire to make this the last time I address this problem, I decided in addition to upgrading the check valves, I would also change out all the plumbing to AN braided lines instead of the rubber stuff that comes with the ADD W1.
Why AN? Because they provide a leakproof seal. Granted, nothing was technically wrong with the hoses and clamps provided by ADD W1 but AN is the way to go if you really want to do things once.
ADD W1 offers AN fittings on their site, -10AN and -8AN. For the 3.3TT we technically need -8AN and -6AN given the hose diameter for the ADD W1 catch can. Why didn't I order these fittings from elsewhere? Simple, the ADD W1 can does not take the standard 3/8" fitting or an ORB (o-ring boss) fitting, and they're certainly not an AN fitting. How do I know? Because I spun my wheels on several fittings before heading over to the ADD W1 website.
I figured i'd order four -8AN fittings and once they arrive i'll just use an -8AN to -6AN reducer, which should work fine. While I was ordering, I figured i'd opt for the oil drain valve since who wants to unmount the can each time it needs to be drained??
Naturally, you'll also need the appropriate -8AN and -6AN braided hoses and fittings are well, but you can source these from Amazon, Jegs, or Summit Racing.
The ADD W1 AN fittings arrive and to my dismay, they were loose. They did not fit the catch can snugly.
I pull out the digital caliper and now I see the difference.
The fittings the come with the ADD W1 are 16MM
The AN fittings on the ADD W1 site are about 15.6MM which is just enough for them not to fit snugly and while you could use teflon tape to try to take up the slack, they simply would not torque down to provide an airtight seal, which defeats the purpose of this project if that critical part — eliminating possible vacuum leaks — couldn't be done.
The -8AN to -6AN reducer is on one of the fittings just so you could see it
Armed with this information, I went off to find -8AN to 16MM (Russell 670550) and -6AN to 16MM (Russell 670530) fittings, which I found on Summit Racing, which should fit plenty snug
Prior to install, I used some Vibra-TITE on the threads. I prefer Vibra-TITE to Loctite for several reasons, but chiefly because with Vibra-TITE you can reposition the bolt without needing to reapply and the application is seamless unlike Loctite which just drips all over the place. Apply Vibra-TITE to the threads, it becomes dry to the touch in about a minute, and it's ready to install after 10 minutes.
If you're in a bind, Loctite would do, but use 242 blue as opposed to the permanent red.
Here are the McMaster-Carr check valves with the 3/8 NPT to -8AN Russell fittings attached to -8AN hoses that I made.
Here you can see the two -8AN to 16MM fittings leading to the -8AN hoses and the -6AN to 16MM fitting leading to the -6AN hose
Used an AN hose separator to keep everything tidy
-8AN hose finisher going to the intake (it just looks cleaner than a spring or worm clamp)
We're all buttoned up
Lastly, you see the rubber drain hose. I can quickly get a cup underneath and flip the valve to drain the oil from the can.
I would strongly recommend, at a bare minimum, upgrading your check valves. You don’t have to go full on with AN fittings and braided hoses like I did, it’s overkill for this application...but it does look nice.
You can simply get the McMaster-Carr check valves and four 3/8 NPT to 1/2” barbs to swap out the ADD W1 check valves and not touch anything else to achieve the same result without the AN hoses and fittings. I would also opt for some spring clips or solid worm clamps just for peace of mind.
16 replies
·
8836 views

