If you're in the US and feeling shafted by the lack of remote start like me, you can get an OEM remote start from kia. Fear not, I'll walk you through the installation process.
The instructions that come with it are great, but removing trim panels can be a bit daunting to the every-man and nobody wants to break a panel on a new car. So I'm going to tell you how to do this without doing that so you can save some money on installation by doing it yourself.
What you'll need:
1. Purchase the kit. OEM Remote Start Genuine KIA acessory. Heres one from KiaPartsWorld for $400
2. Get a set of trim removal tools. Something like these: Trim Removal Tools
3. Something to cut the tails off the zip-ties
4. flashlight 'cus hey... it's dark down there.
1. When the kit arrives, check the box and make sure all the parts are there. Nothings more annoying than starting something to find out your missing a piece and have to wait. There's 3 main pieces here, the wiring harness, the control module, and the Receiver Module. (2 key fobs and zip ties).
Note: Go ahead and attach the wiring harness to the new control module, make sure you plug it into the correct side. The instructions will show you the image of the module, pay attention to where the sticker is on the module in that image so you plug it into the correct side.
2. As per the instructions, you'll want to disconnect the negative terminal from the battery. Did I do this? no, and that was dumb. I REALLY should've disconnected it. I was lucky and nothing happened but man, i really should've disconnected it.
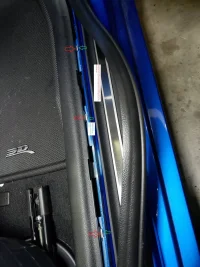
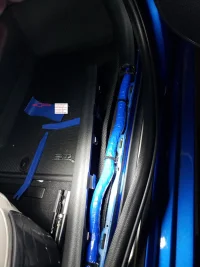
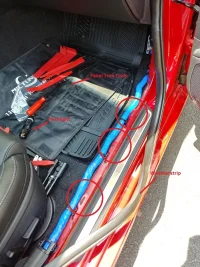
3. On the passenger side, open the door and gently pry the weather stripping off the rail and let it hang out of the way.
4. The instructions will tell you to remove the Door Threshold Panel. This is the trim piece directly next to the seat, in-between the aluminum door sill scuff plate and the seat. This needs to be removed first so you can gain access to remove the passenger kick panel as the two pieces overlap slightly.
Once you've moved the weather stripping out of the way, you'll see it is held in place by 3 clips that can be pushed inward and up to release, and 2 hooks (one on either side). Release those and pull upward. Once released, set the panel aside.
5. Next, remove the Lower HVAC panel. This is the panel right below your glove-box. This ones easy, just reach under it and look/feel for the 2 pull tabs near the top, pull them upward to release the panel. If you have a light installed there, you will need to disconnect it once you've removed the panel. NOTE: there is NOT a lot of slack in the wires, so be careful not to pull the panel until you've disconnected the light.
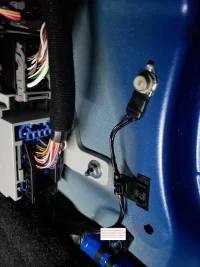
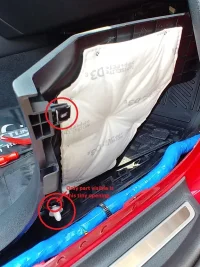
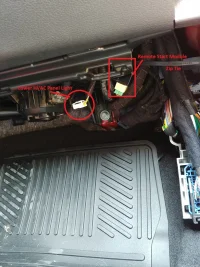
6. Remove the passenger kick panel. This is the panel between the door and the lower HVAC panel you just removed. This is the tricky one. It's held in by a tab and a push-pin as noted in the image. The pushpin is completely hidden behind the panel so to get to that we'll undo the metal tab first. The metal tab you will see easily on the top right of the panel next to the weatherstripping. Dislodge the tab to give yourself a tiny bit more give in the panel, and shine a flashlight in the gap if you have to. You're looking for a tiny little bit of white which is the push pin, circled in the attached image. You'll need your forked trim removal tool to slide behind the panel, capture and dislodge the white pushpin. Take your time here, the last thing you want to do is break anything, it did not require a lot of pressure to pop it out, the trim tool just has to be in the right place.
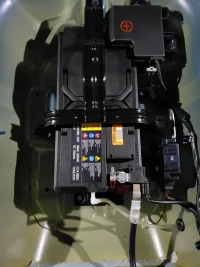
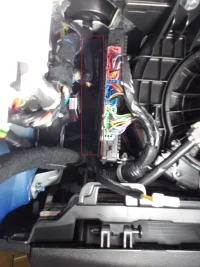
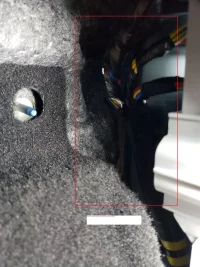
7. Now you have access to the electrics. The receiver mounts in the back at the firewall, refer to the attached image for visual placement. Zip tie it to the factory harness as high up in there as you can get it.
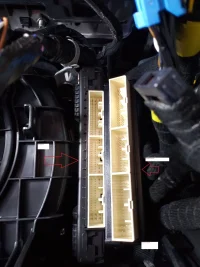
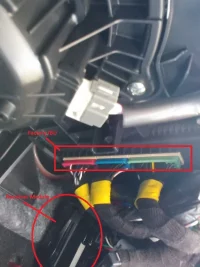
8. The control module goes right up behind the factory IBU, which you can easily identify as the other box with red/blue/green connectors. Your going to zip tie the new control module directly behind the factory IBU, it will fit snug. The wires with the yellow tape on the connectors from the new control module, will make a U-shape, coming down underneath the two modules. You'll zip tie the new control module also as high up as you can. Mounting this too low will interfere with the trim panels re-installation.
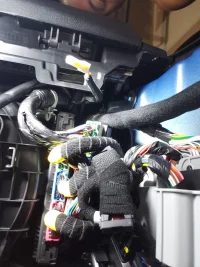
9. Unplug the red/blue/green from the factory IBU and plug them into open ports on the new control module, then plug the red/blue/green from the other side of the new control module, into the newly vacant slots on the factory IBU.
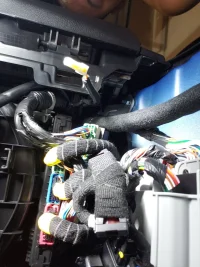
10. Plug the two remaining connectors into the receiver.
11. Reconnect the battery, and test it out with the included remote. Follow the instructions to check the functionality but you should be good to go. You will need to hit the keyfob button once to lock the doors, then within 3 seconds, press the button again to activate the remote start.
12. Put all the panels back in reverse order.
13. Push the weather stripping back into place.
14. Enjoy the new remote-start function!
Note: you can start it by pressing Lock, then either trunk or horn button within 3 seconds to activate remote start without using the additional keyfob.
Enjoy!
The instructions that come with it are great, but removing trim panels can be a bit daunting to the every-man and nobody wants to break a panel on a new car. So I'm going to tell you how to do this without doing that so you can save some money on installation by doing it yourself.
What you'll need:
1. Purchase the kit. OEM Remote Start Genuine KIA acessory. Heres one from KiaPartsWorld for $400
2. Get a set of trim removal tools. Something like these: Trim Removal Tools
3. Something to cut the tails off the zip-ties
4. flashlight 'cus hey... it's dark down there.
1. When the kit arrives, check the box and make sure all the parts are there. Nothings more annoying than starting something to find out your missing a piece and have to wait. There's 3 main pieces here, the wiring harness, the control module, and the Receiver Module. (2 key fobs and zip ties).
Note: Go ahead and attach the wiring harness to the new control module, make sure you plug it into the correct side. The instructions will show you the image of the module, pay attention to where the sticker is on the module in that image so you plug it into the correct side.
2. As per the instructions, you'll want to disconnect the negative terminal from the battery. Did I do this? no, and that was dumb. I REALLY should've disconnected it. I was lucky and nothing happened but man, i really should've disconnected it.
3. On the passenger side, open the door and gently pry the weather stripping off the rail and let it hang out of the way.
4. The instructions will tell you to remove the Door Threshold Panel. This is the trim piece directly next to the seat, in-between the aluminum door sill scuff plate and the seat. This needs to be removed first so you can gain access to remove the passenger kick panel as the two pieces overlap slightly.
Once you've moved the weather stripping out of the way, you'll see it is held in place by 3 clips that can be pushed inward and up to release, and 2 hooks (one on either side). Release those and pull upward. Once released, set the panel aside.
5. Next, remove the Lower HVAC panel. This is the panel right below your glove-box. This ones easy, just reach under it and look/feel for the 2 pull tabs near the top, pull them upward to release the panel. If you have a light installed there, you will need to disconnect it once you've removed the panel. NOTE: there is NOT a lot of slack in the wires, so be careful not to pull the panel until you've disconnected the light.
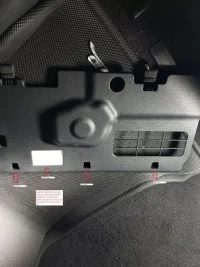
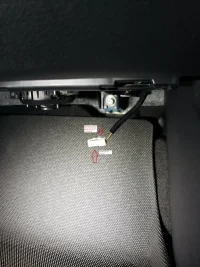
6. Remove the passenger kick panel. This is the panel between the door and the lower HVAC panel you just removed. This is the tricky one. It's held in by a tab and a push-pin as noted in the image. The pushpin is completely hidden behind the panel so to get to that we'll undo the metal tab first. The metal tab you will see easily on the top right of the panel next to the weatherstripping. Dislodge the tab to give yourself a tiny bit more give in the panel, and shine a flashlight in the gap if you have to. You're looking for a tiny little bit of white which is the push pin, circled in the attached image. You'll need your forked trim removal tool to slide behind the panel, capture and dislodge the white pushpin. Take your time here, the last thing you want to do is break anything, it did not require a lot of pressure to pop it out, the trim tool just has to be in the right place.
7. Now you have access to the electrics. The receiver mounts in the back at the firewall, refer to the attached image for visual placement. Zip tie it to the factory harness as high up in there as you can get it.
8. The control module goes right up behind the factory IBU, which you can easily identify as the other box with red/blue/green connectors. Your going to zip tie the new control module directly behind the factory IBU, it will fit snug. The wires with the yellow tape on the connectors from the new control module, will make a U-shape, coming down underneath the two modules. You'll zip tie the new control module also as high up as you can. Mounting this too low will interfere with the trim panels re-installation.
9. Unplug the red/blue/green from the factory IBU and plug them into open ports on the new control module, then plug the red/blue/green from the other side of the new control module, into the newly vacant slots on the factory IBU.
10. Plug the two remaining connectors into the receiver.
11. Reconnect the battery, and test it out with the included remote. Follow the instructions to check the functionality but you should be good to go. You will need to hit the keyfob button once to lock the doors, then within 3 seconds, press the button again to activate the remote start.
12. Put all the panels back in reverse order.
13. Push the weather stripping back into place.
14. Enjoy the new remote-start function!
Note: you can start it by pressing Lock, then either trunk or horn button within 3 seconds to activate remote start without using the additional keyfob.
Enjoy!
Attachments

Last edited: