what did you end up doing ?
took the console out. and just pressed each leg of the resistor into each pin of the harness. it's tight enough that the resistor will stay without cutting or having to solder

what did you end up doing ?
What was the value of the resistor?took the console out. and just pressed each leg of the resistor into each pin of the harness. it's tight enough that the resistor will stay without cutting or having to solder
What was the value of the resistor?
Hey its the guy who bought the bms pedal tuner from ya.I bet that would look really nice. I was surprised how easy it was to lift up the console.
can't get any easier than stuffing a zip tie end down one side of the button......I barely notice it's there and Haven't givin the feature a thought til this thread popped up, lolis there a better way? Like what if you wanted to reroute the button? I hate the auto off as much as y’all.
Where can I find info on this module that you reference in this post?that is the "cheap" way to do it ... or you can buy a module but honestly why when we can use some electrical tape

Thank you! I checked that link (I think might have been in this thread?)....it is a dead link for me.
Thank you Steveco!The link appears dead because the forum software tries to auto-complete the I S G abbreviation in the text. Edit the URL in your address bar and delete everything between the /I S G and the first dash (-and).
View attachment 56516
there is an alternative , are you interested? I could try to get some for CanadaThe link appears dead because the forum software tries to auto-complete the I S G abbreviation in the text. Edit the URL in your address bar and delete everything between the /I S G and the first dash (-and).
View attachment 56516
Thanks @Gtecko. I got one of the shark racing ones...works great.There is another alternative available
there is an alternative , are you interested? I could try to get some for Canada
I installed one of these and it works great. The difference between this and just jamming the switch with something is that the module will remember what you had previously set it to and restore that state when you next start the car. The module does both the ISG and the auto-hold function.
There may be other resellers, I'm not sure.
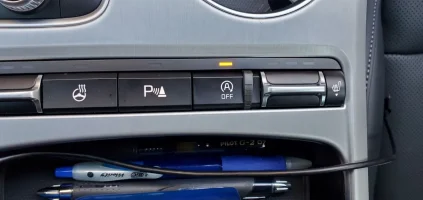
Hey thanks for this! The 2022 also has the birds eye view button but your tutorial is still sound. It might be worth mentioning that very little tape is needed. I also folded the tape adhesive side out thinking that may help it stick to enclosure/button and prevent falling out when the two pieces are clipped back together. Love the fact it’s just as easy to undo. Too bad it just doesn’t remember it’s state when restarted.This is the annoying Auto Start/Stop button on the center console (the “A” with the circle around it with an arrow) that you have to push every time you start the car to disable Auto Start/Stop. This mini project should take less than 30 minutes to complete.
Step 1: Open up the center colsole as seen in the “GT Stinger and Me” colsole replacement video. Don’t remove it all the way, just lift it up. It’s super easy to do.
View attachment 18831
Step 2: Remove the 5 screws holding the row of buttons to the console. There is a screw in the 4 corners, plus another one hiding. You don’t have to unplug any wires.
View attachment 18832
View attachment 18833
Step 3: Undo the clips on bottom of both sides of the button housing. There are 4 on one side and a few on the other. Once the clips are loose, the housing will slide right off.
View attachment 18842
View attachment 18835
Step 4: Now you’ll see the circuit board. Turn the plastic housing (the one with the plastic buttons) upside down to reveal the piece that pushes the button on the circuit board.
View attachment 18836
View attachment 18837
Step 5: Roll up some black electrical tape with the sticky side on the outside. Cut it a bit to size and stick it in the button hole. You really don’t need it to be very think, just enough to keep the button pressed down at all times. If the tape is too thick it will make your button stick up a little bit when you put it back together. This bit of tape will keep the circuit board button pressed at all times without the need to physically press the plastic button down. When it’s put back together the button will look normal and you won’t be able to push it down even if you try.
View attachment 18838
View attachment 18839
Step 6: Put the button housing back on the circuit board and make sure all the buttons are working. Put all the screws back in, then clip the console back down into place. Now the Auto Start/Stop button will always be turned off when you start the engine.
View attachment 18841
Side note: I have not seen or heard of any issues with this button being continuously pressed. The button doesn’t get warm or cause any issues. The other buttons in the row (heated/cool seats and heated steering wheel) will turn off after a few seconds if their button is held down.